

 Deutsch
 Español
 Français
 Hrvatski
 Italiano
 Polski
 Português (BR)
Create & Manage Plan Markups
Overview
Plan markups let you visually highlight, annotate, and communicate information directly on your project plans—whether for collaboration or personal reference.
- Public markups are visible to all users with plan access.
- Private markups are visible only to the creator.
- Measurements (Distance, Path and Area) work like markups and calculate the distance or area.
Access & permissions
Read more in Permissions and in User Types.
How to access
You can access, create, and manage plan markups in two locations:
- Tickets Plan View — available in both the Webapp and mobile app
- The Plans section of a project — available in the Webapp only
Markups created in one view are automatically visible in the other.
In the plan preview of the Plans section, markups are hidden until you switch them on.
Since the process is the same in both views, this article uses the tickets plan view as an example.
To access the tickets plan view:
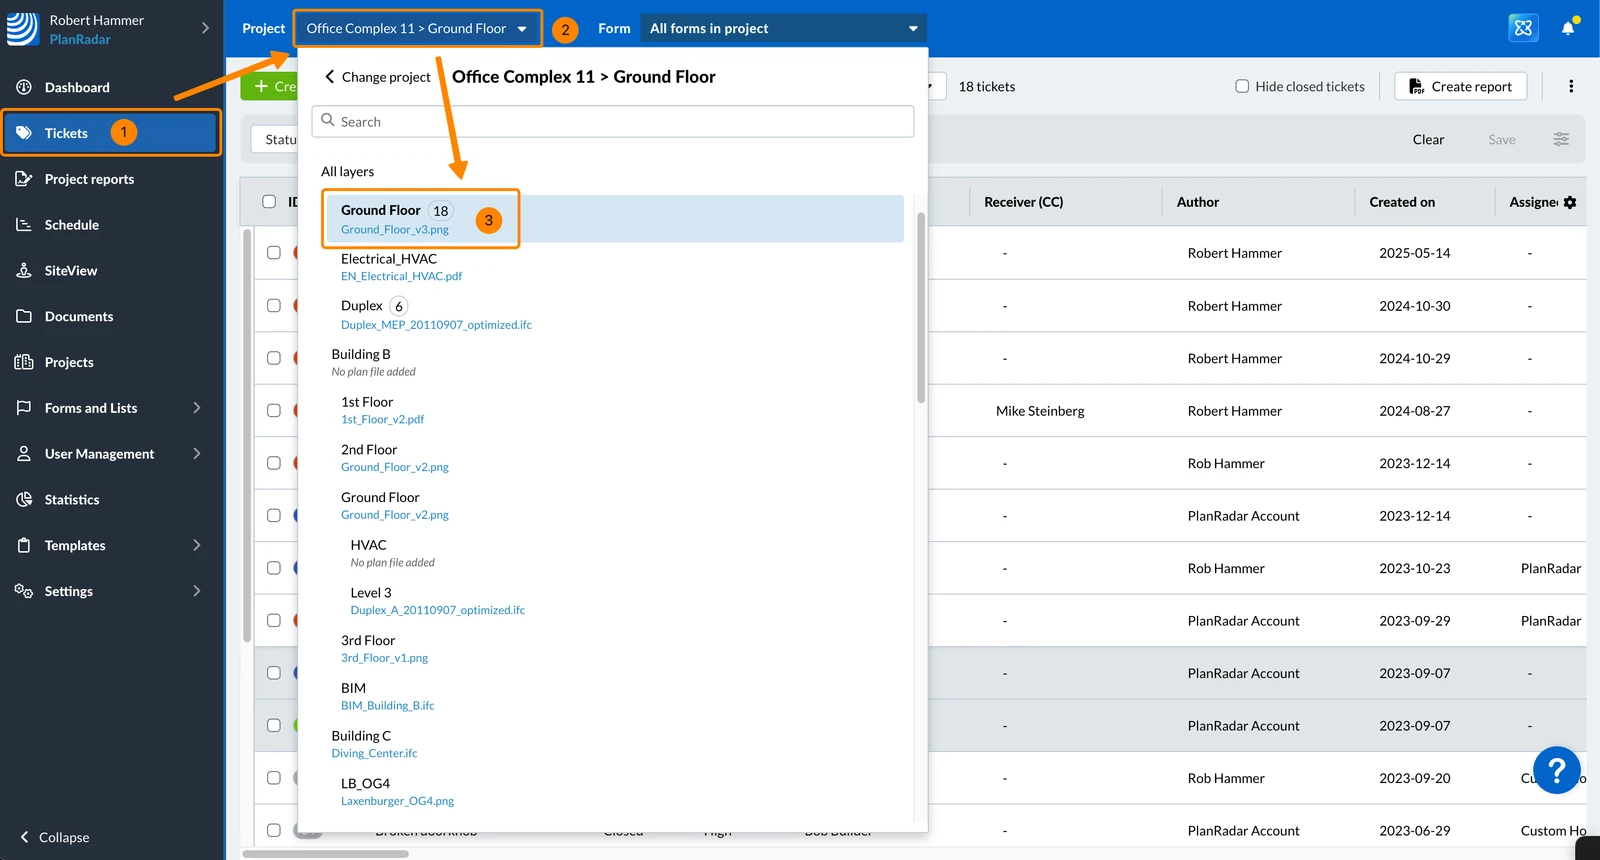
- Click Tickets
- Open the Project menu
- Click the plan e.g. Ground Floor
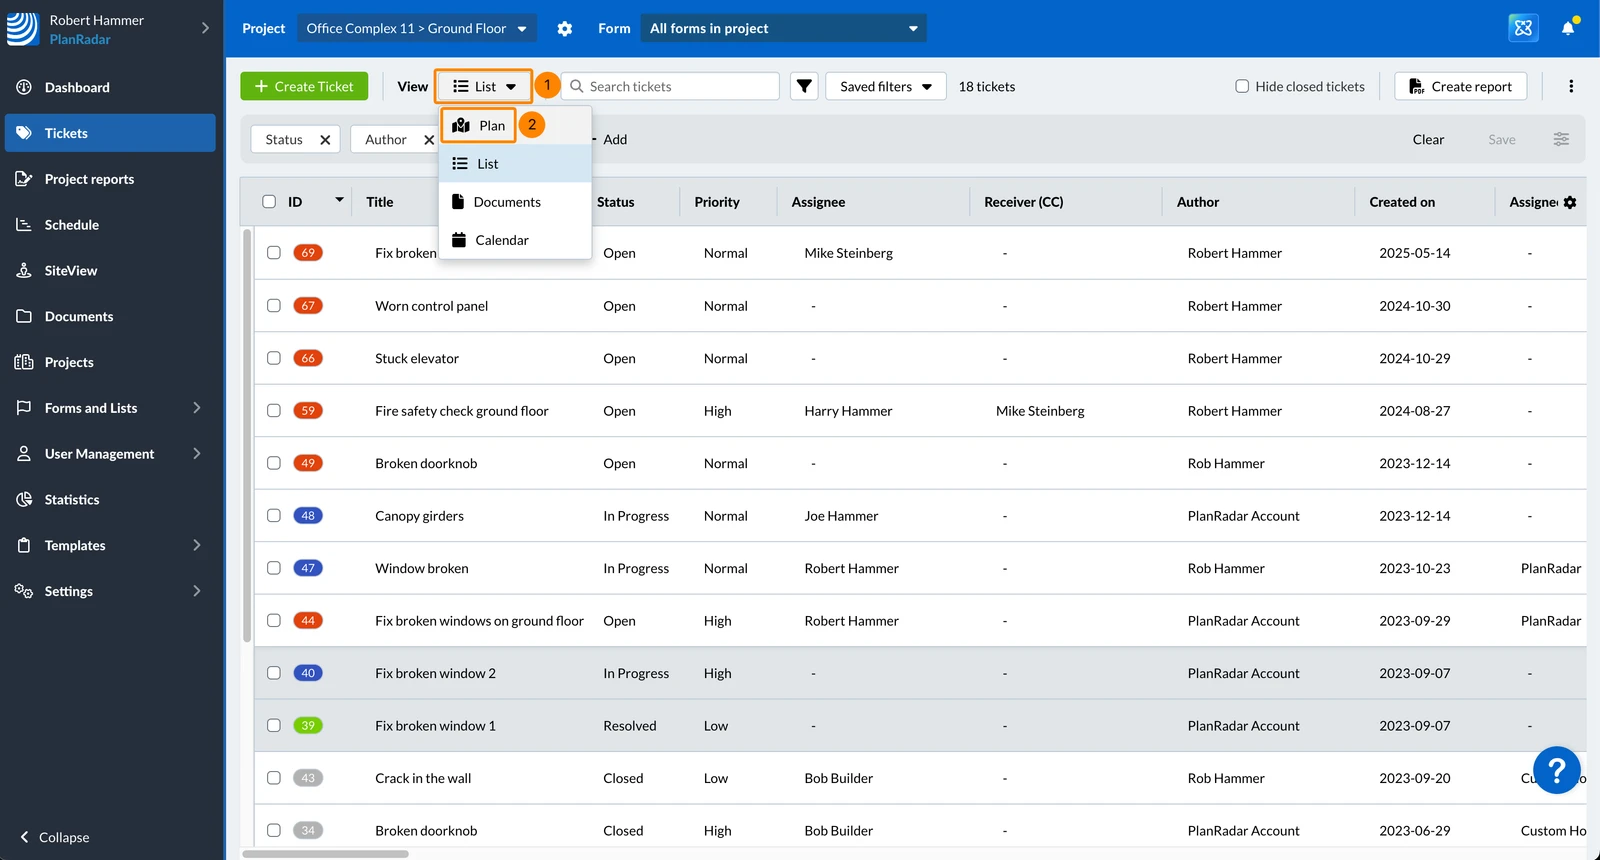
- In the View drop-down select Plan
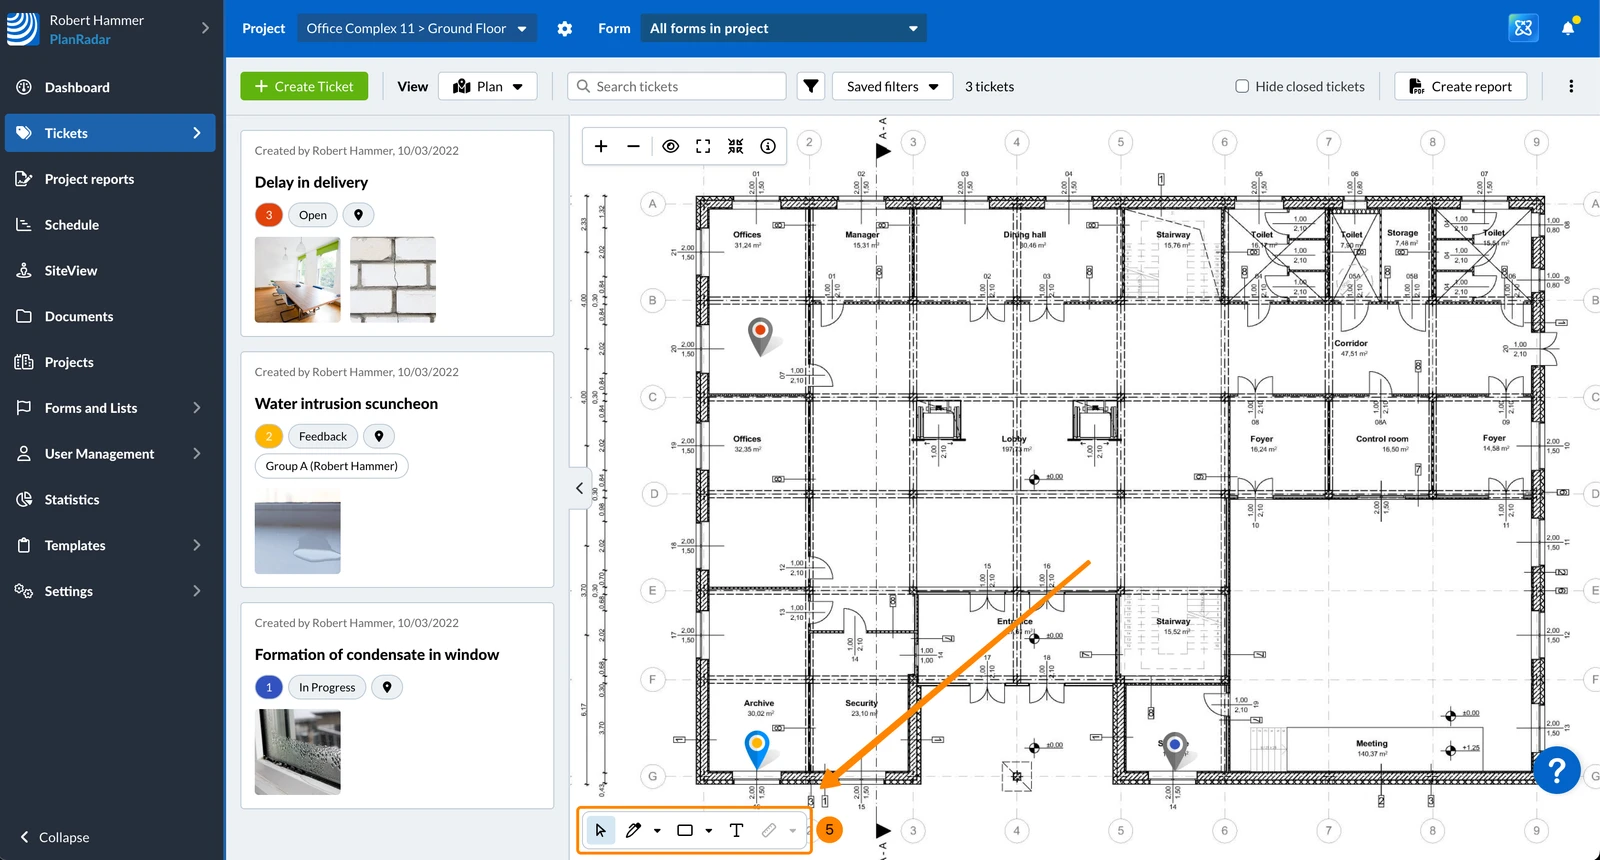
- You see the tickets plan view with the plan markups toolbar
To access a plan in the Plans section of a project:
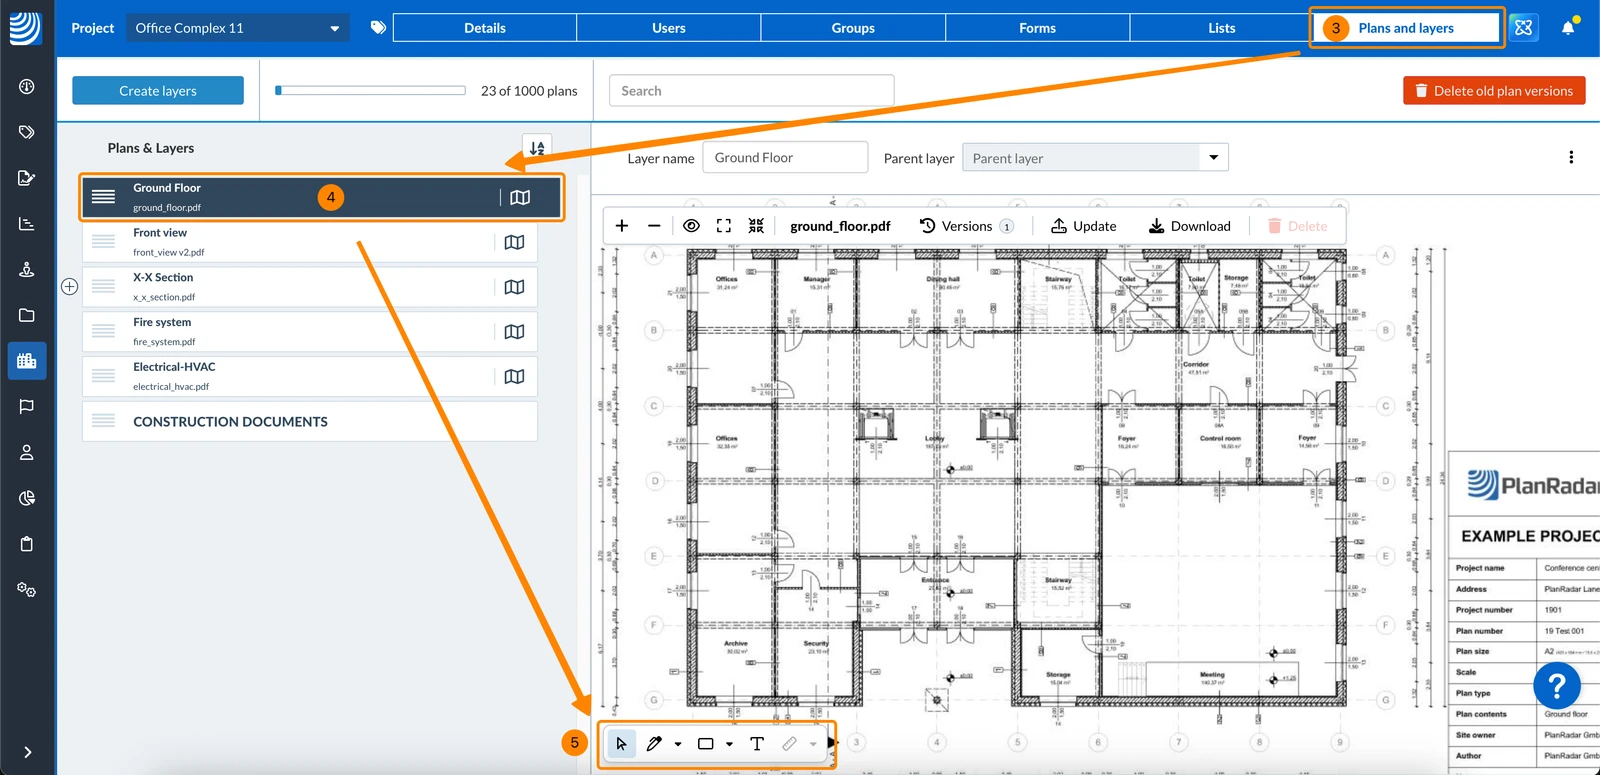
- Click Plans in the main menu
- Select the project in the project drop-down
- Click the plan e.g. Ground Floor
- You see the plan with the plan markups toolbar
- Tap Tickets in the main menu
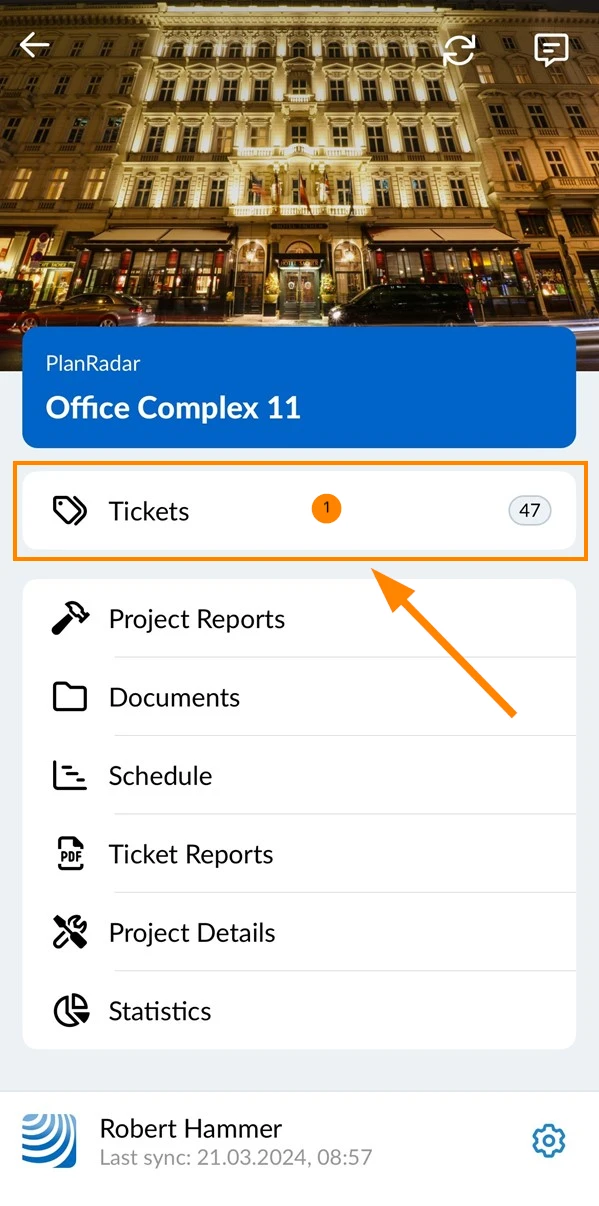
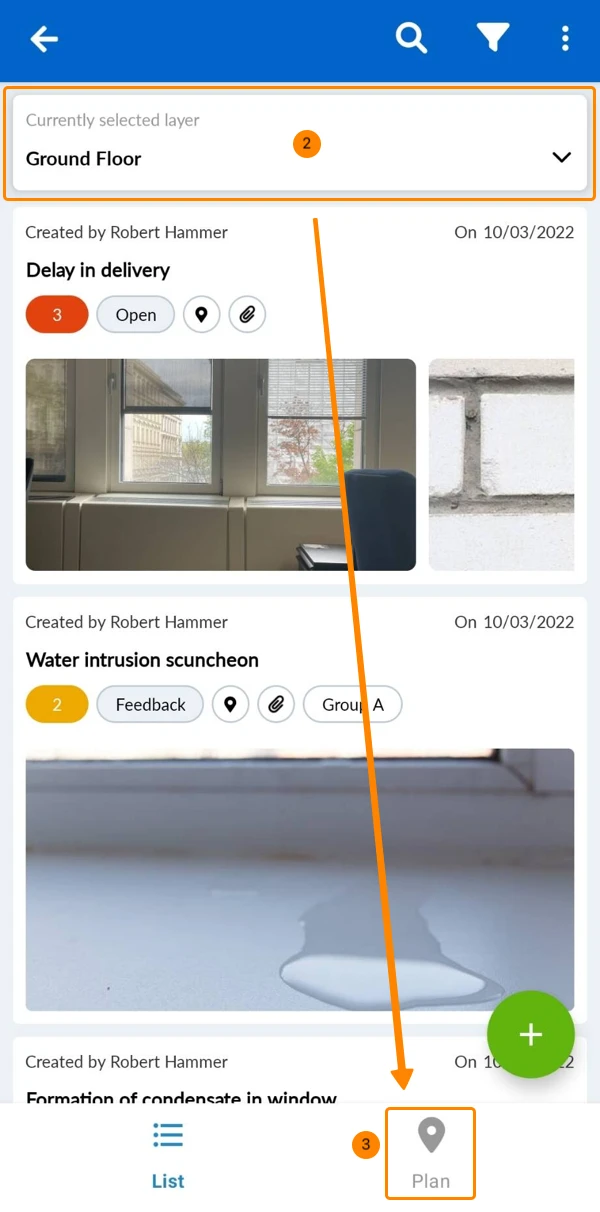
- Select a plan e.g. Ground Floor
The Plan view needs a plan. It is not available while a folder is selected. - Tap Plan
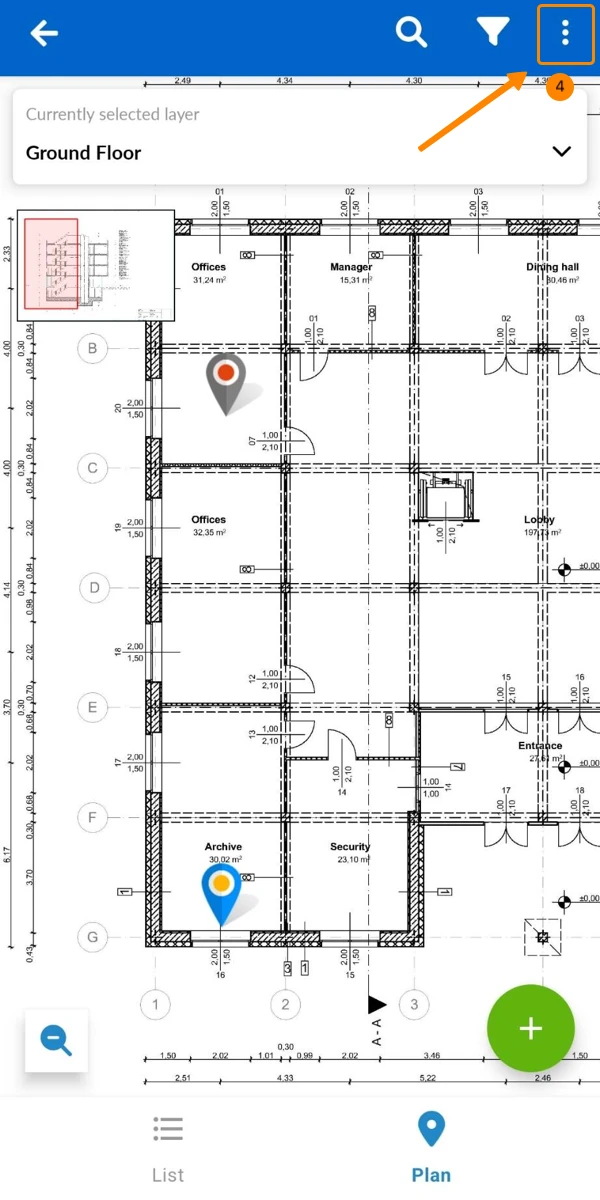
- Open the More menu
- Tap Manage Markups
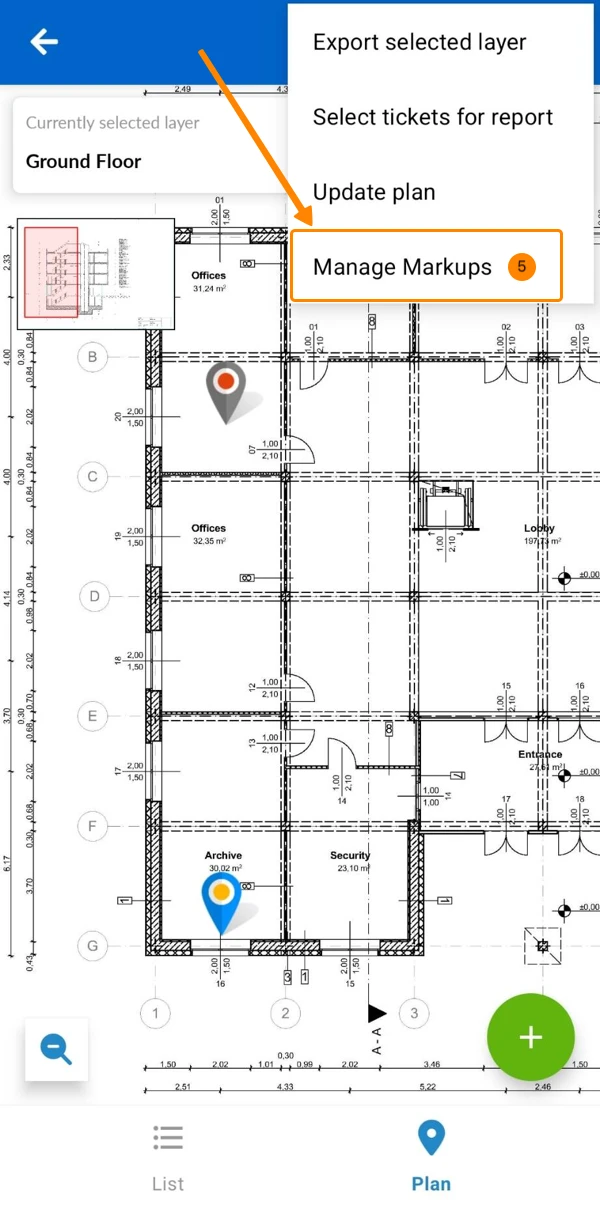
- You see the plan view with the plan markups toolbar
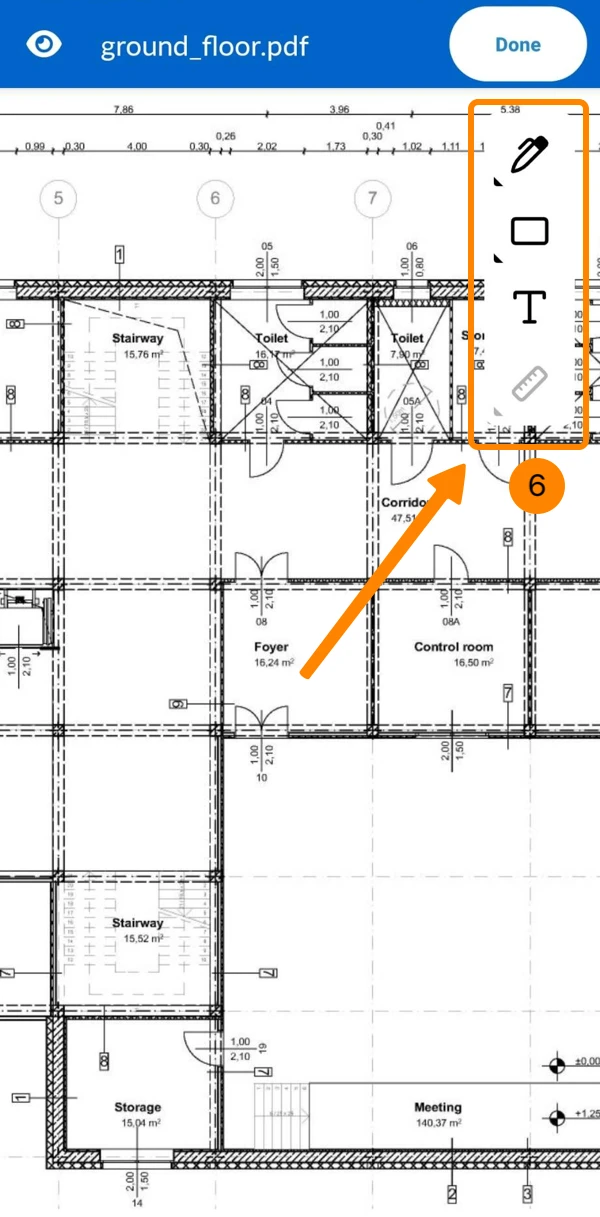
Markup Tools (by Type)
There are different markup tools which are grouped in the following menus by markup types:
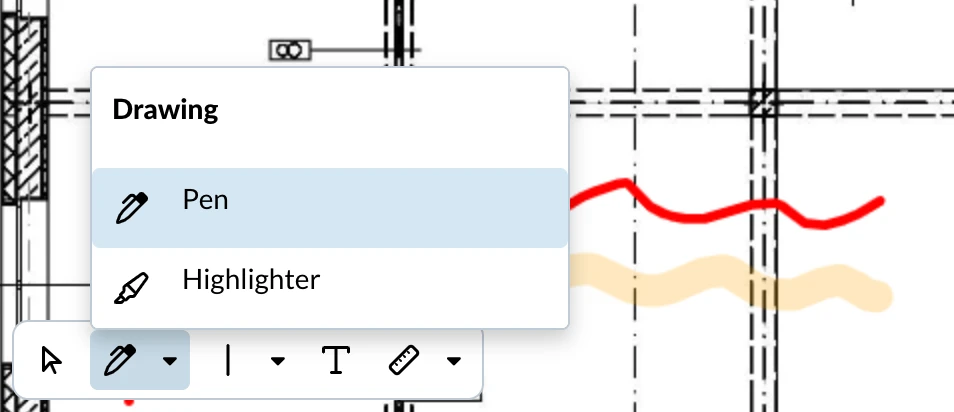
Drawing
Free hand drawings include the Pen and the Highlighter markup tools. They work the same, with the highlighter being thicker and transparent by default.
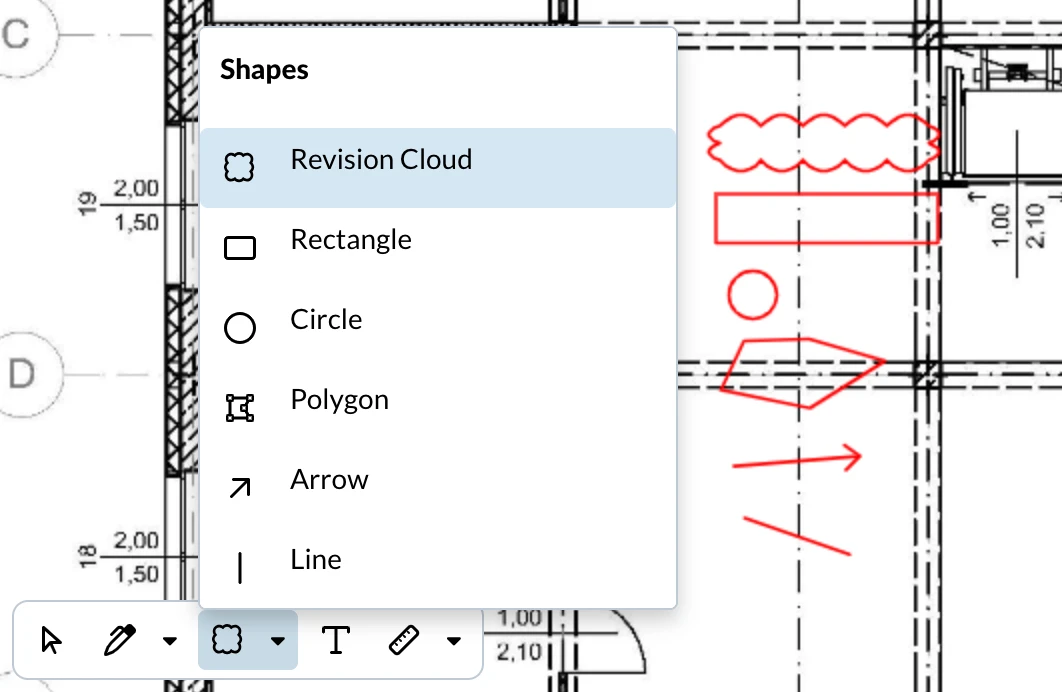
Shapes
Shapes include the Revision cloud, Rectangle, Circle, Polygon, Arrow and Line markup tools.
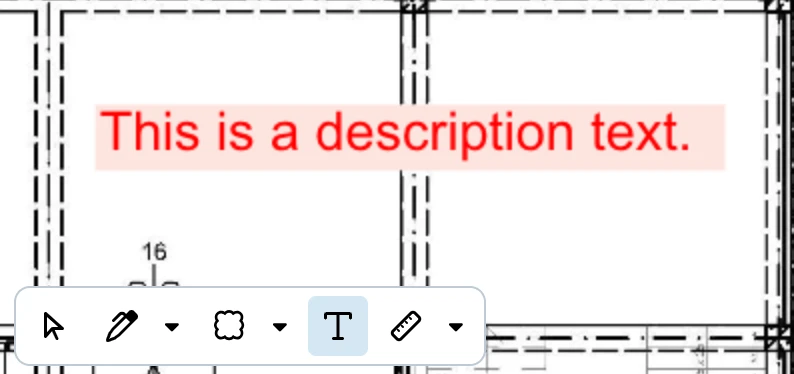
Text
The Text markup tool lets you add written notes directly on the plan.
Measurements
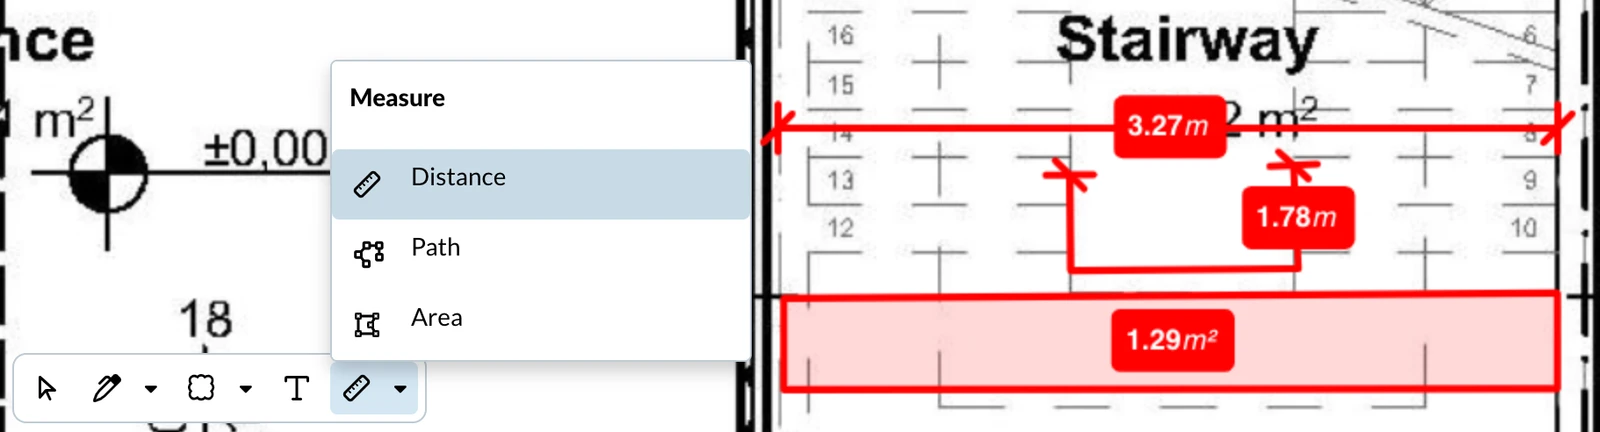
Measurements include the Distance, Path and Area markup tools.
- Distance measures the straight-line distance between two points in meters.
- Path measures the total length between multiple points in meters.
- Area measures the enclosed surface in square meters.
Create Markups
Create a Markup
When you create a new markup, it automatically inherits the formatting settings from the last markup of the same markup tool. This lets you quickly add multiple markups with consistent styling.
All new markups are private by default.
To create a markup:
- Select a markup tool from the toolbar.
- Place or draw the markup on the plan.
- Once you have placed the markup, it is saved automatically and viewed in editing mode.
Place or Draw a Markup
The steps to place or draw a markup vary slightly depending on the markup tool:
Pen and Highlighter:
- Click/tap and hold to start drawing.
- Release to finish.
Text fields, Shapes (except Polygon), and Distance measurements:
- Click/tap and hold to place the first point or corner.
- Release to place the second point or corner.
- For text fields: Type the text and click/tap outside the text field.
Polygon shapes and Area measurements:
- Click/tap to place each point.
- Click/tap the starting point again to close the shape.
Path measurements:
- Click/tap to place each point.
- Double-click/tap the last point or press Enter to finish.
Show/Hide Markups on the Plan
By default you see all markups that you created or that are public:
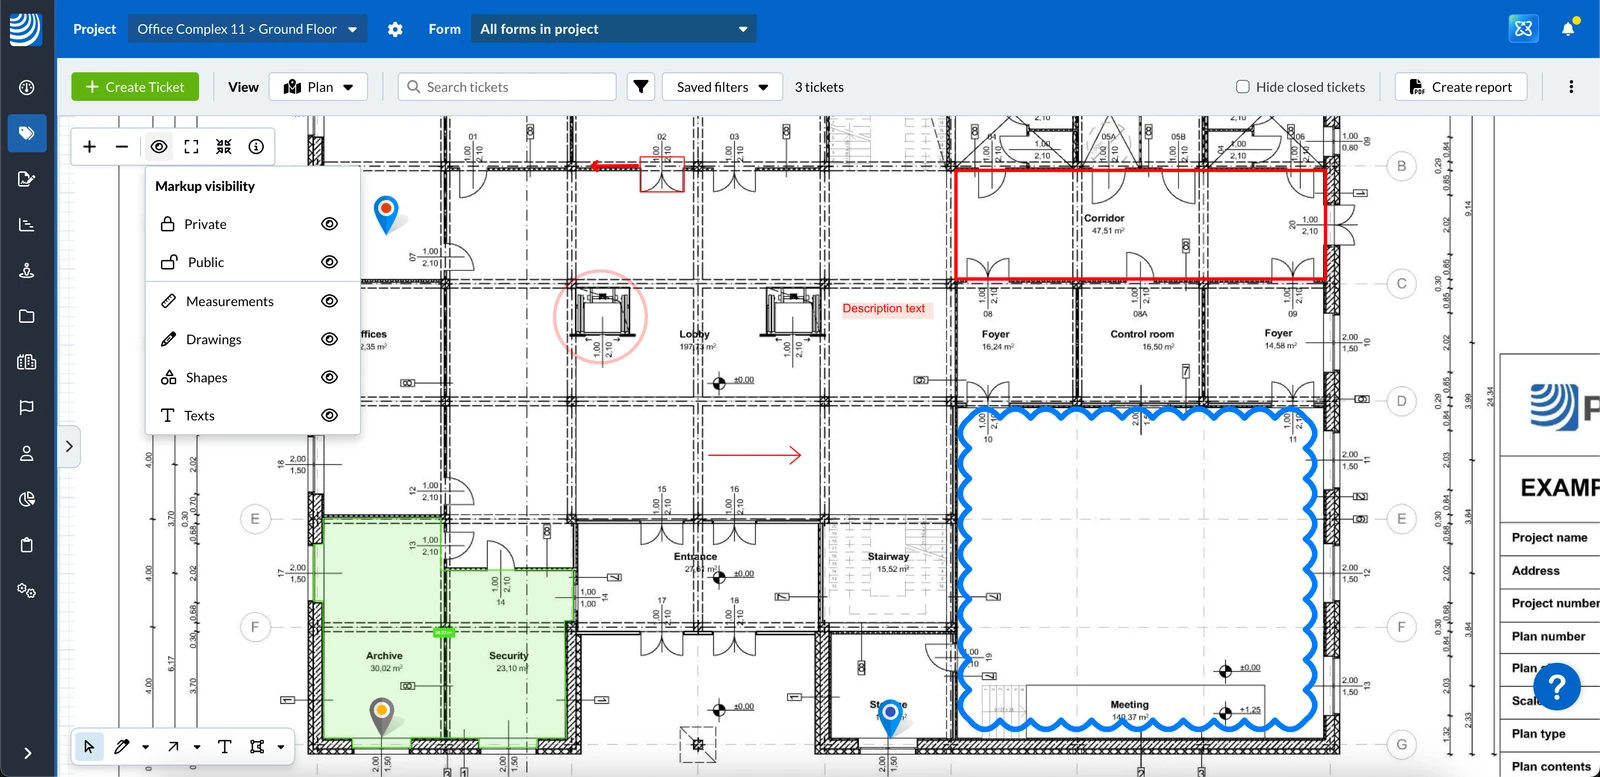
You can show/hide markups by:
-
Markup visibility:
- Private
- Public
-
Markup type:
- Measurements
- Drawings
- Shapes
- Texts
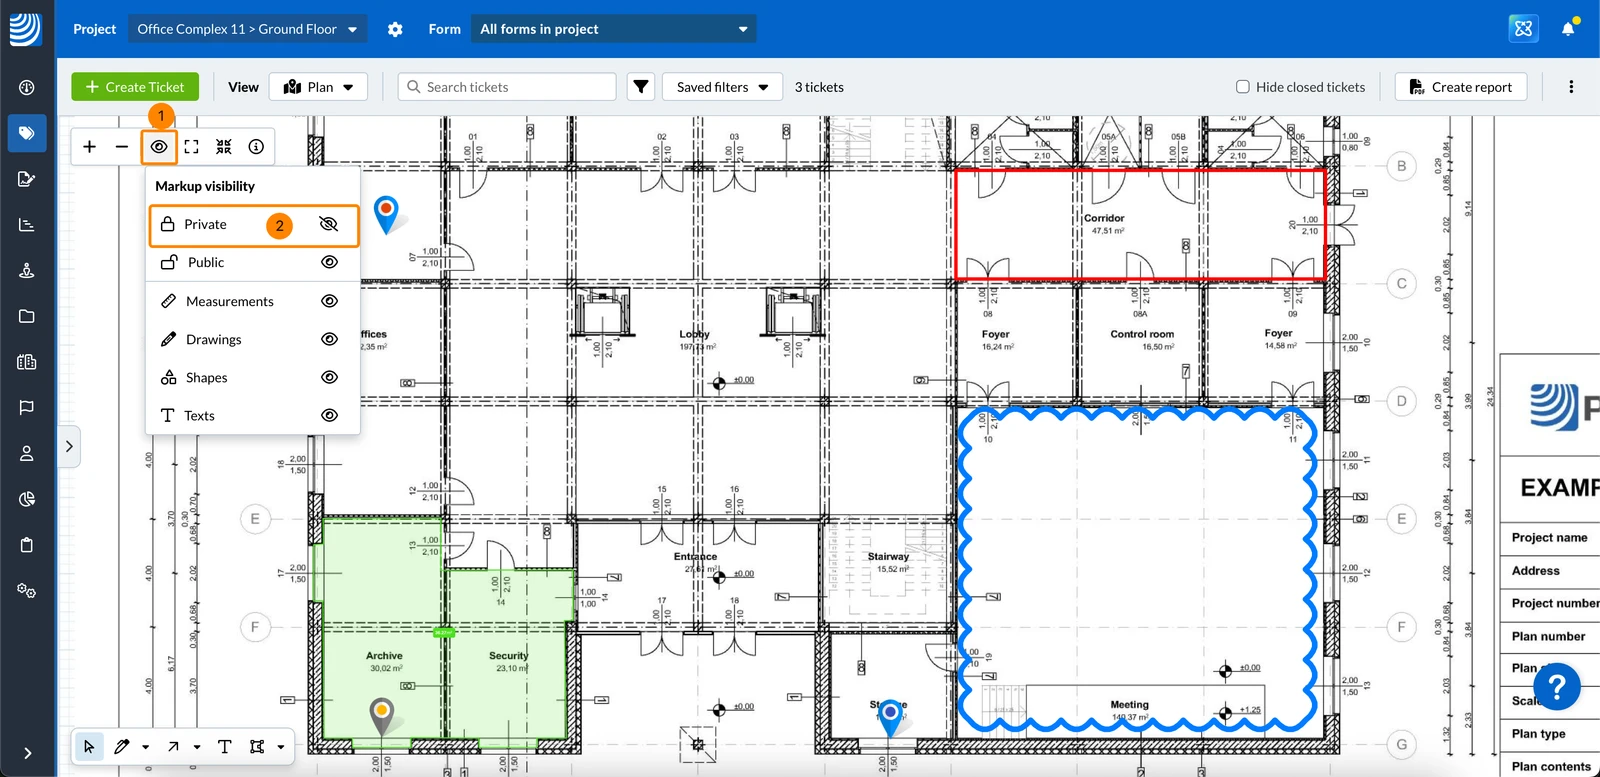
To hide markups by type or visibility:
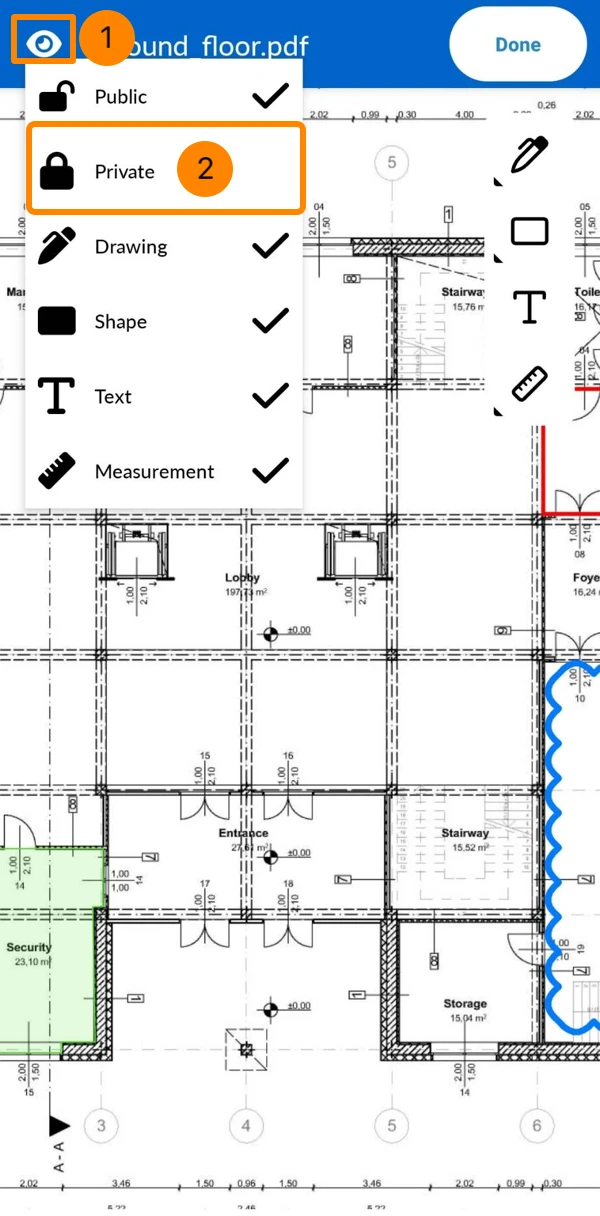
- Click the Eye icon
- Click e.g. Private to hide all private markups.
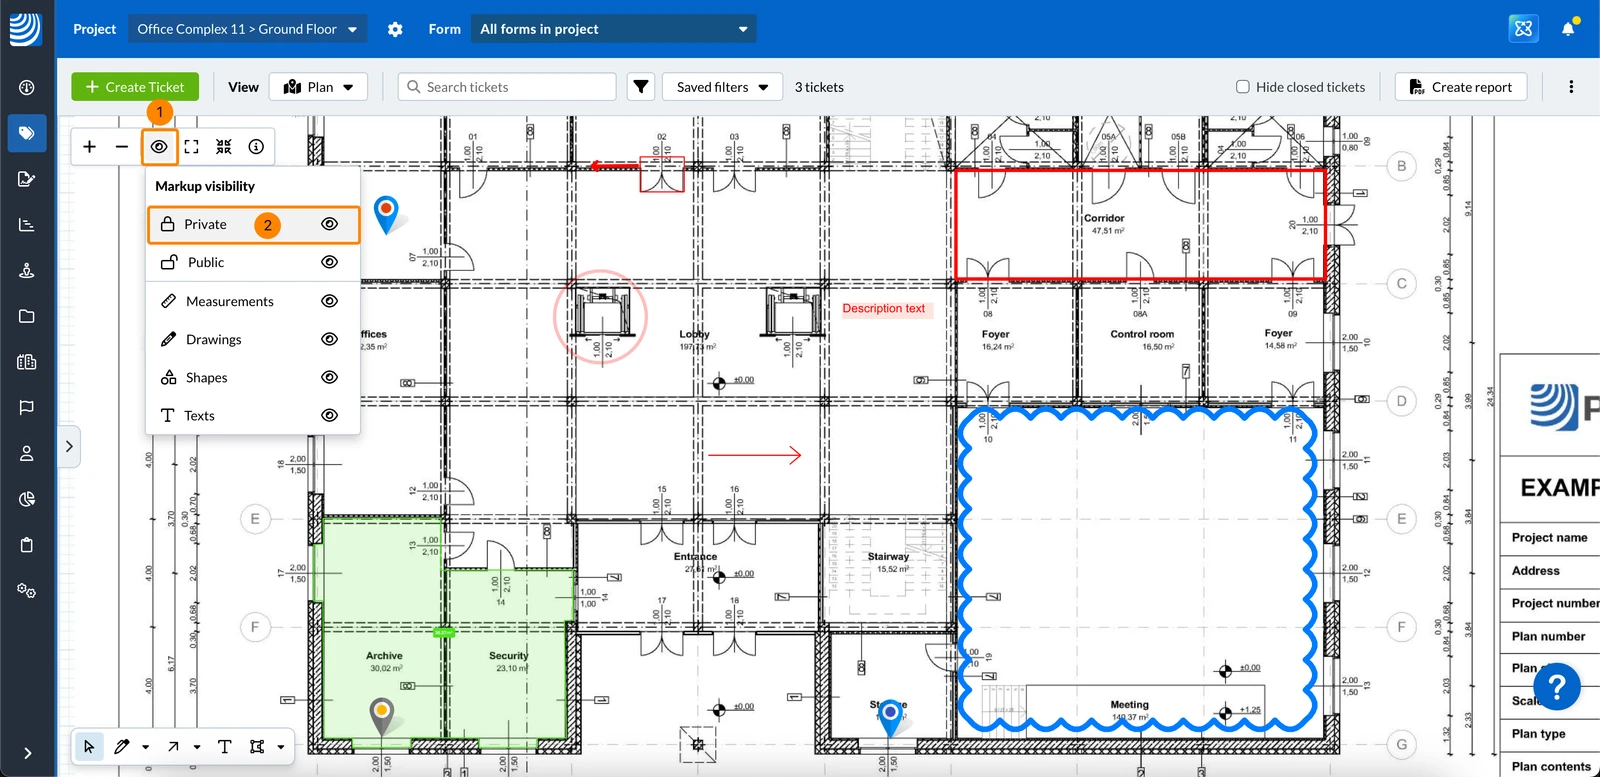
- The crossed-out eye icon indicates which markups are hidden on the plan.
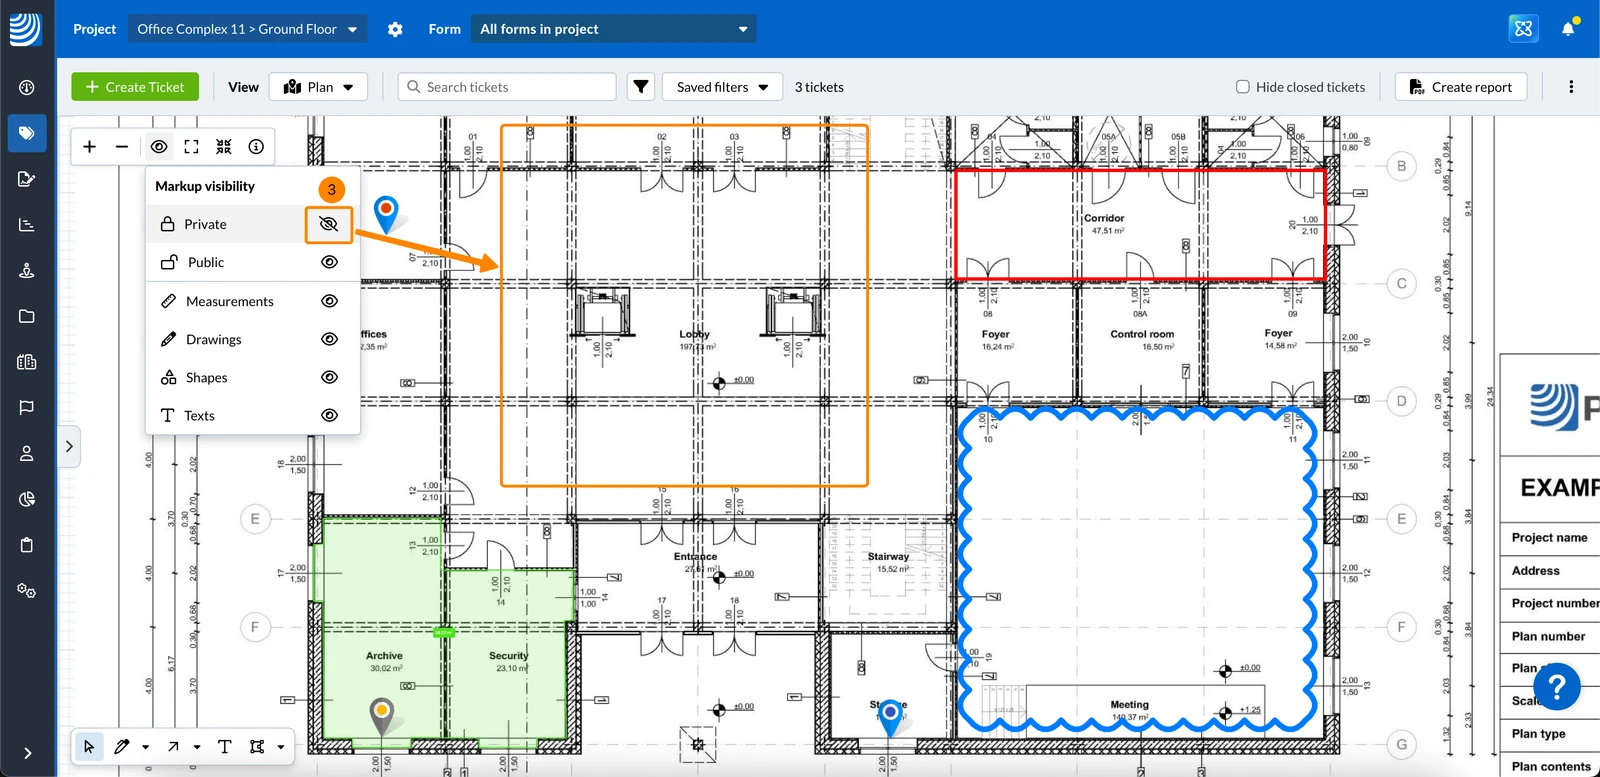
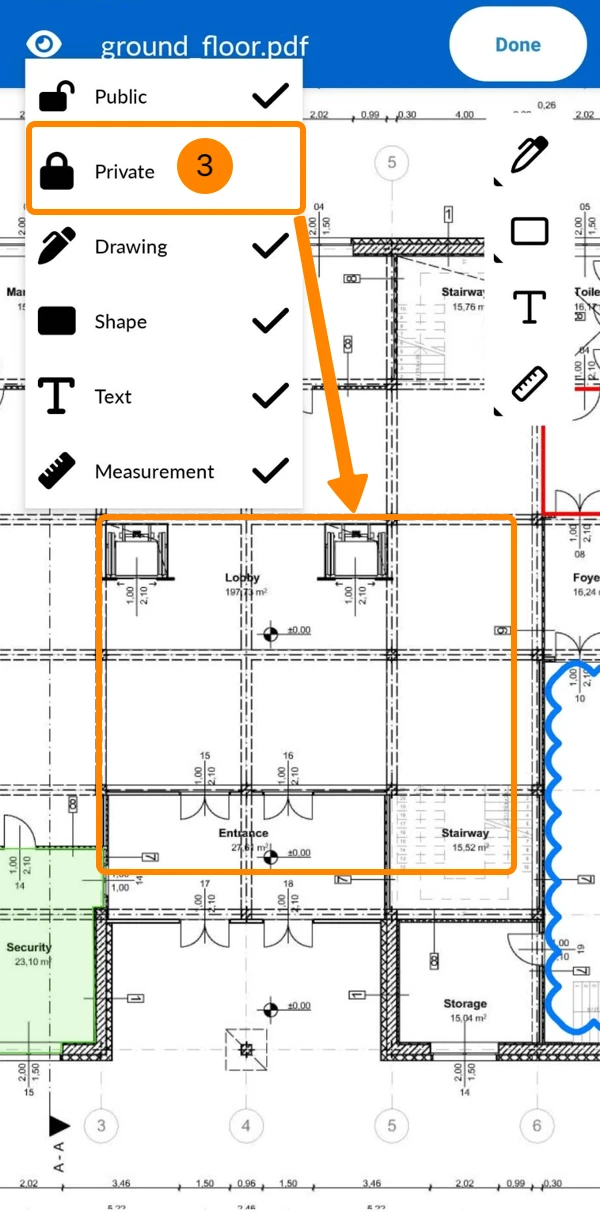
- Tap the Eye icon
- Tap e.g. Private to hide all private markups.
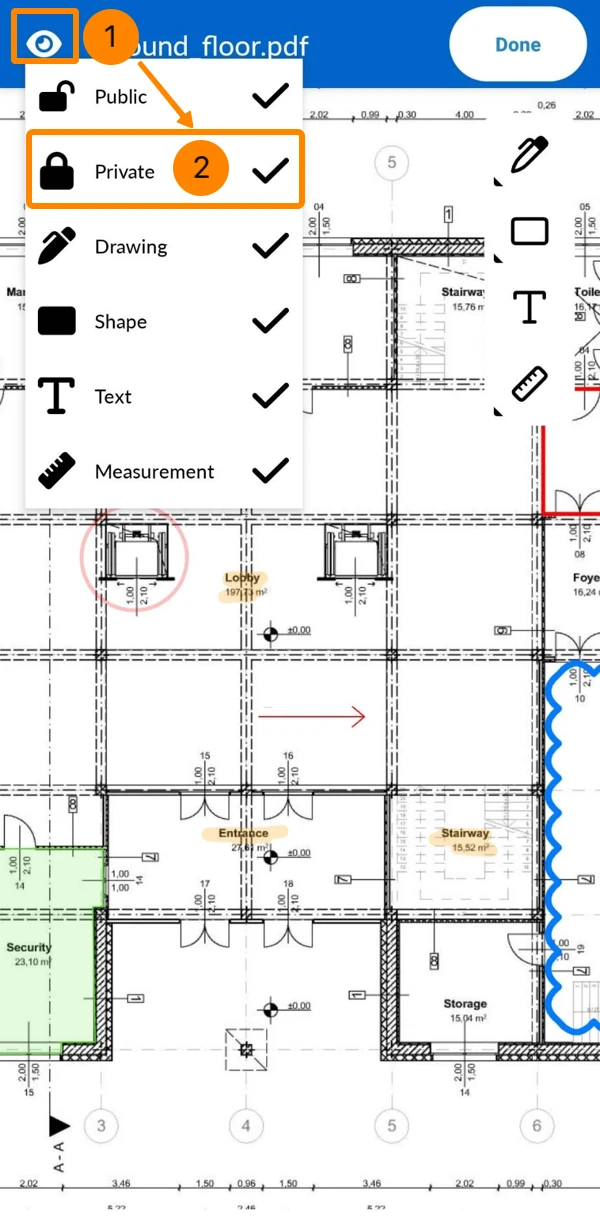
- The missing ✔ indicates which markups are hidden on the plan.
To show markups by type or visibility:
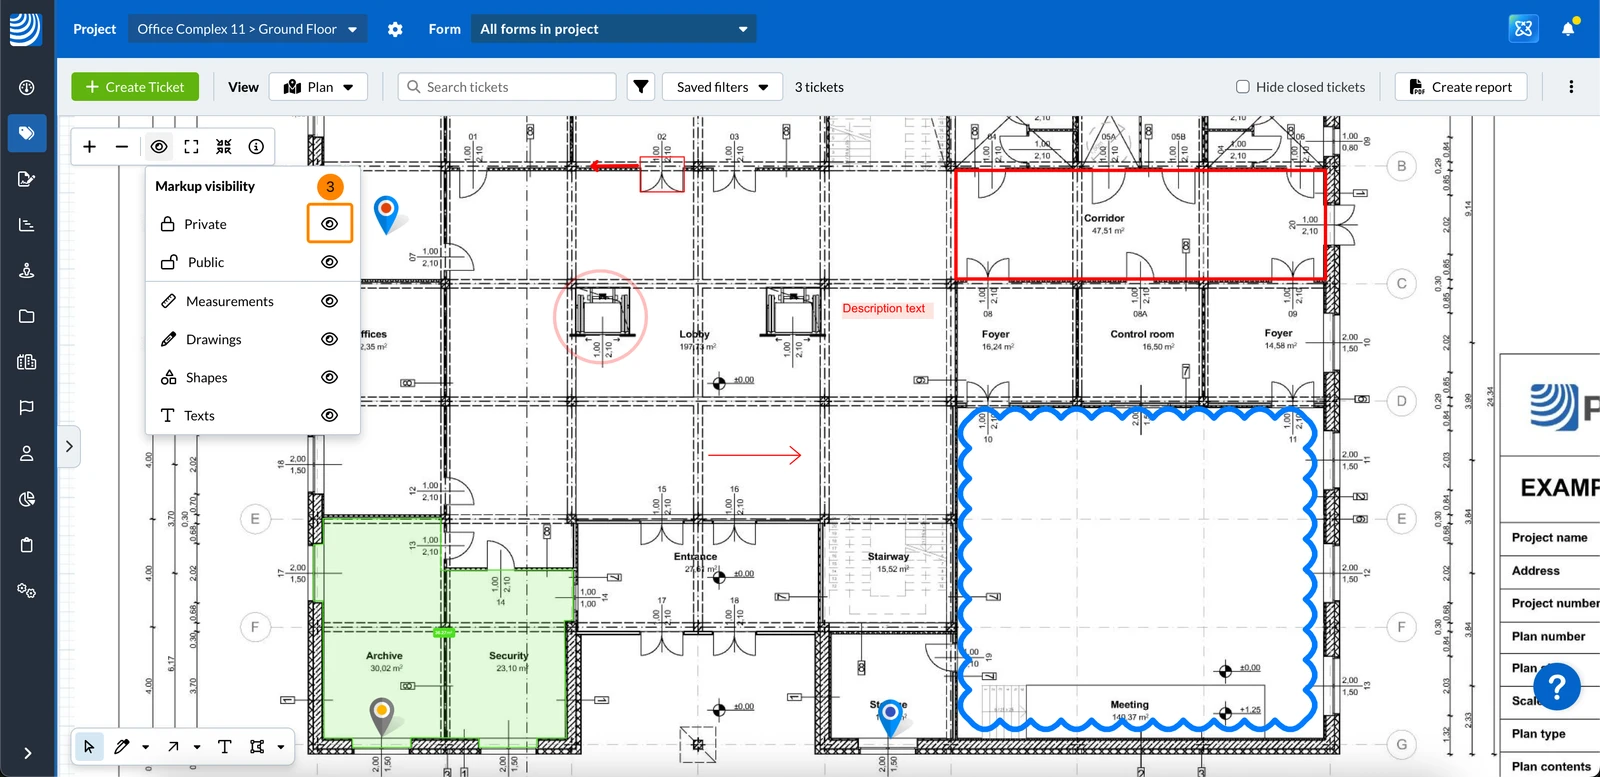
- Click the Eye icon
- Click e.g. Private to show all private markups again.
- The eye icon indicates which markups are shown on the plan.
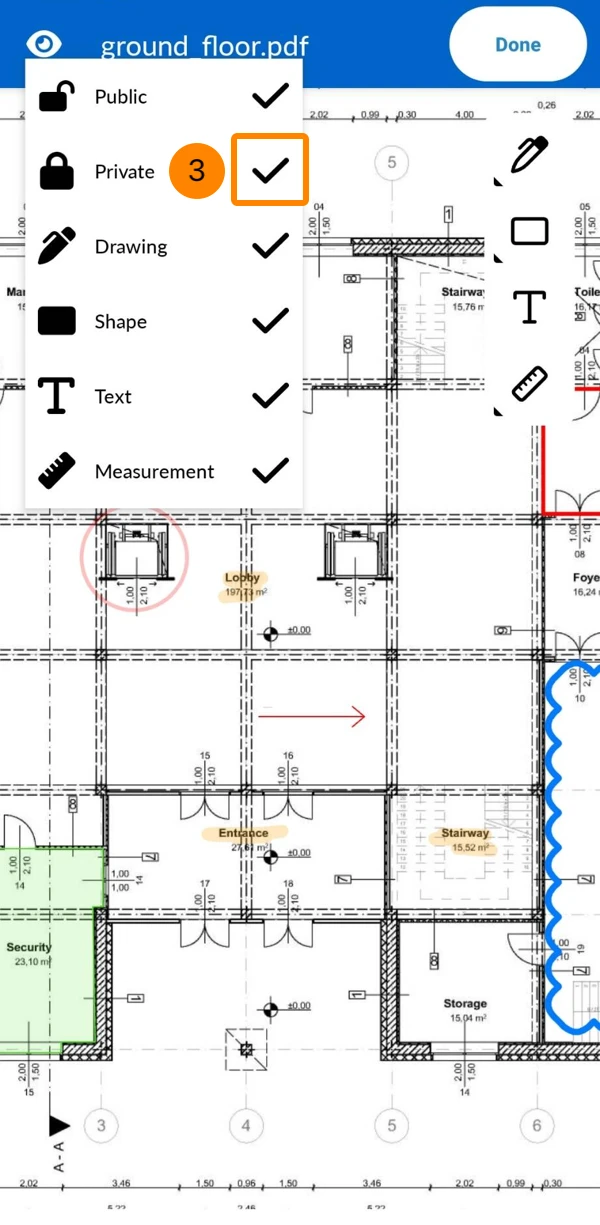
- Tap the Eye icon
- Tap e.g. Private to show all private markups again.
- The ✔ indicates which markups are shown on the plan.
Edit a Markup
Selecting a markup is the first step for all the following instructions.
New markups are automatically selected so you can edit them right away.
Select a Markup
To select a markup:
- Click on the markup
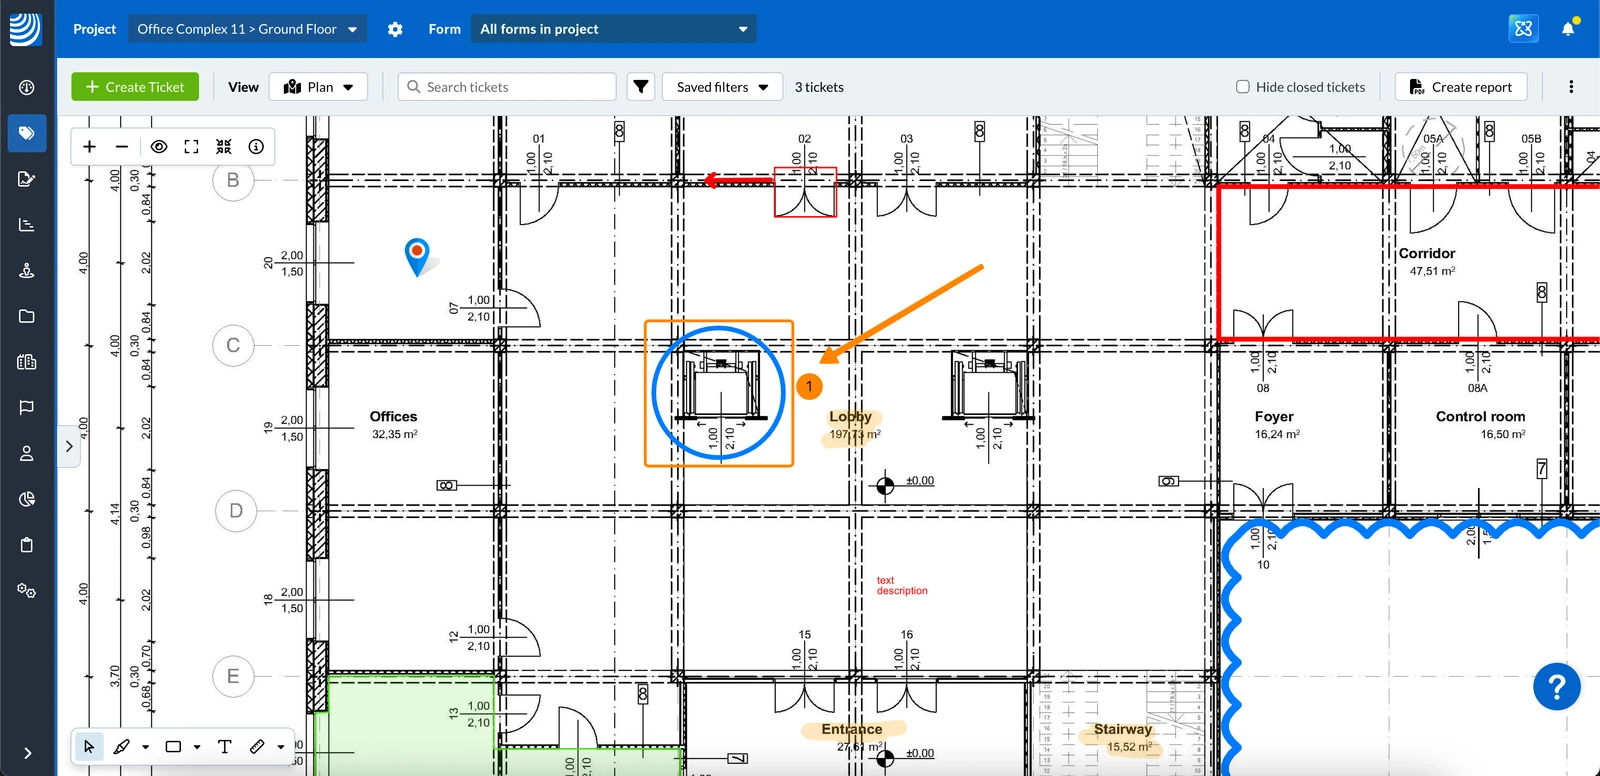
- The selected markup is indicated by a red dotted frame
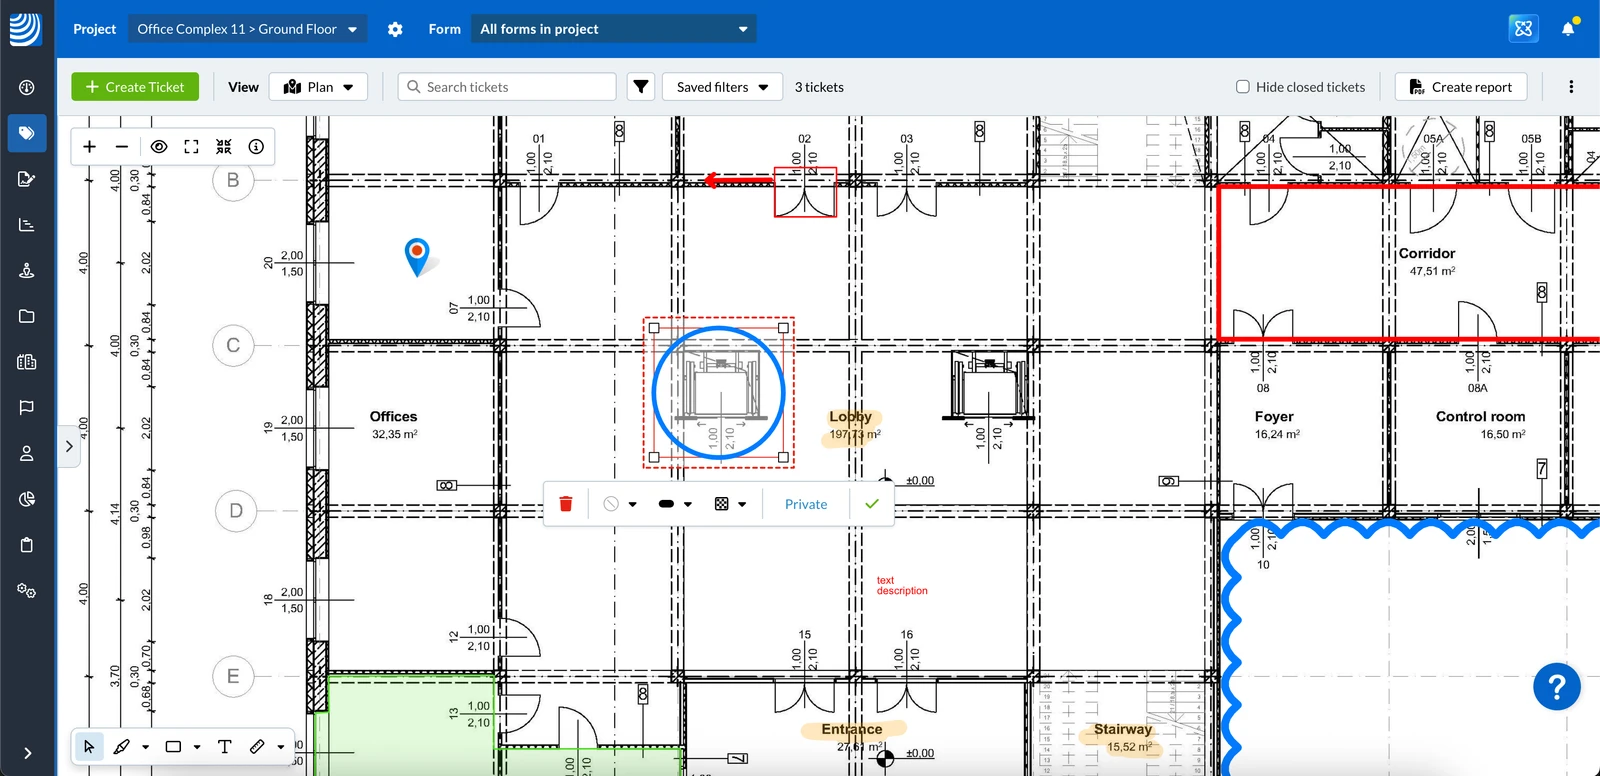
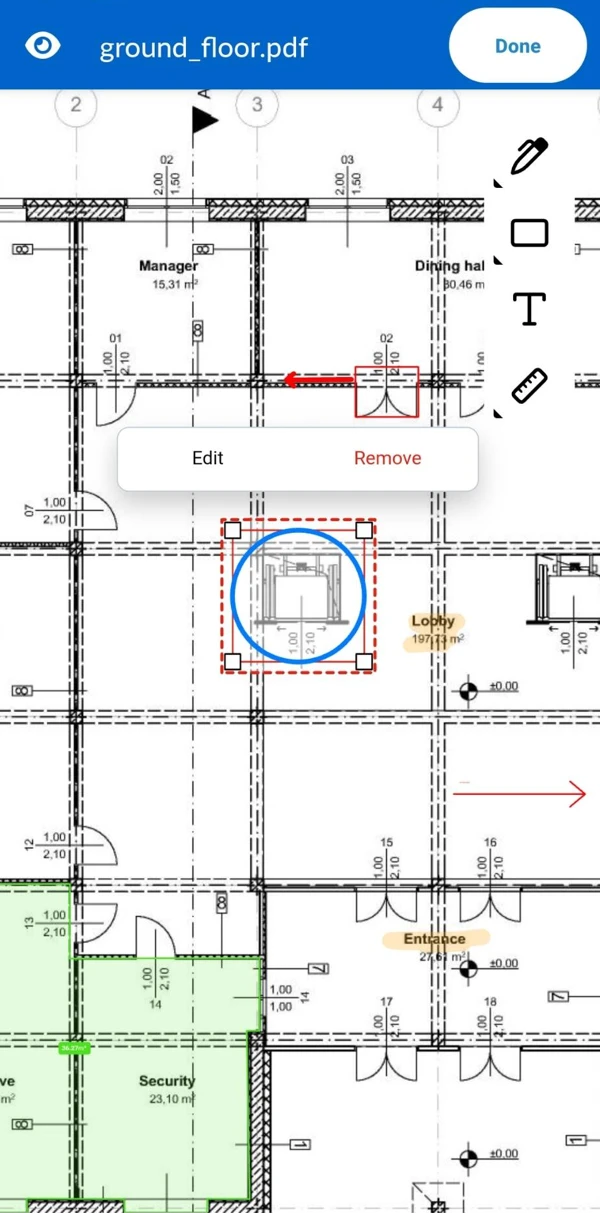
- Tap on the markup
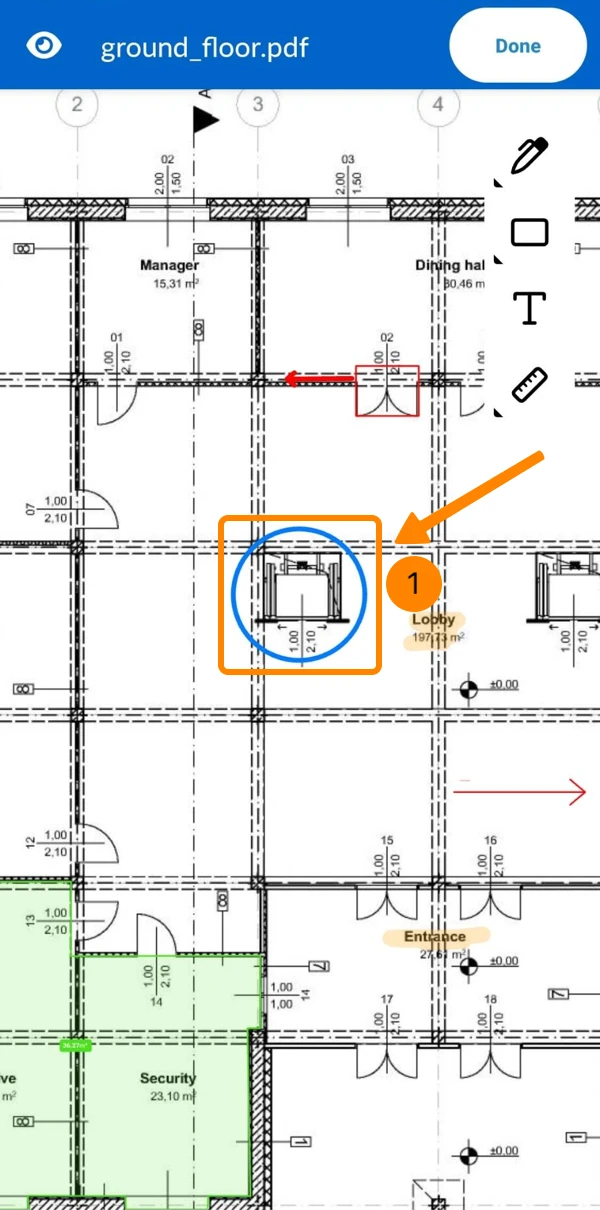
- The selected markup is indicated by a red dotted frame
Change Visibility (Public/Private)
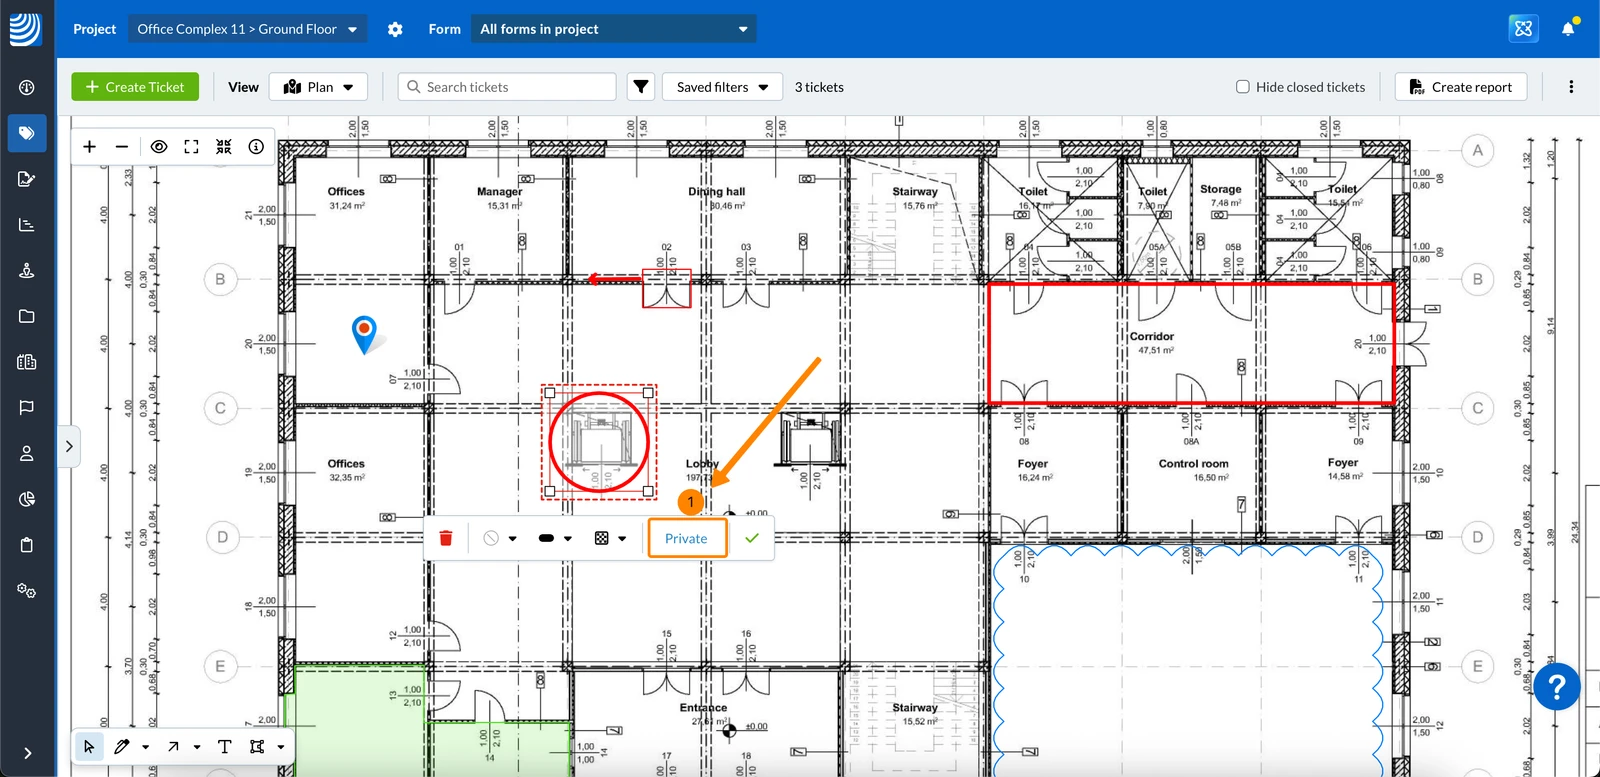
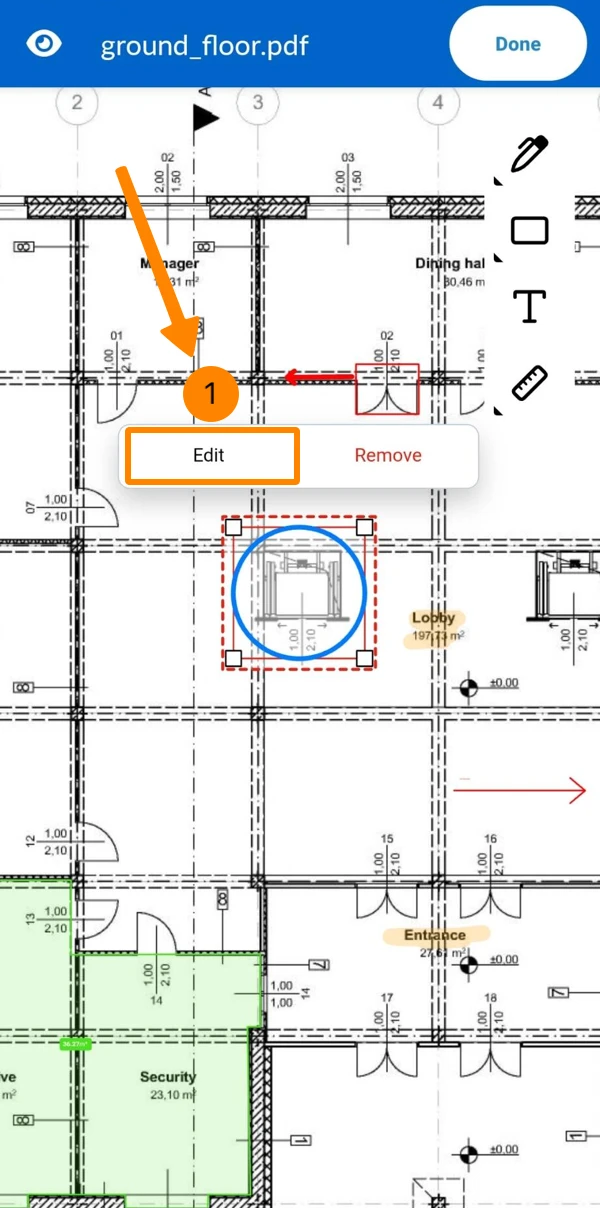
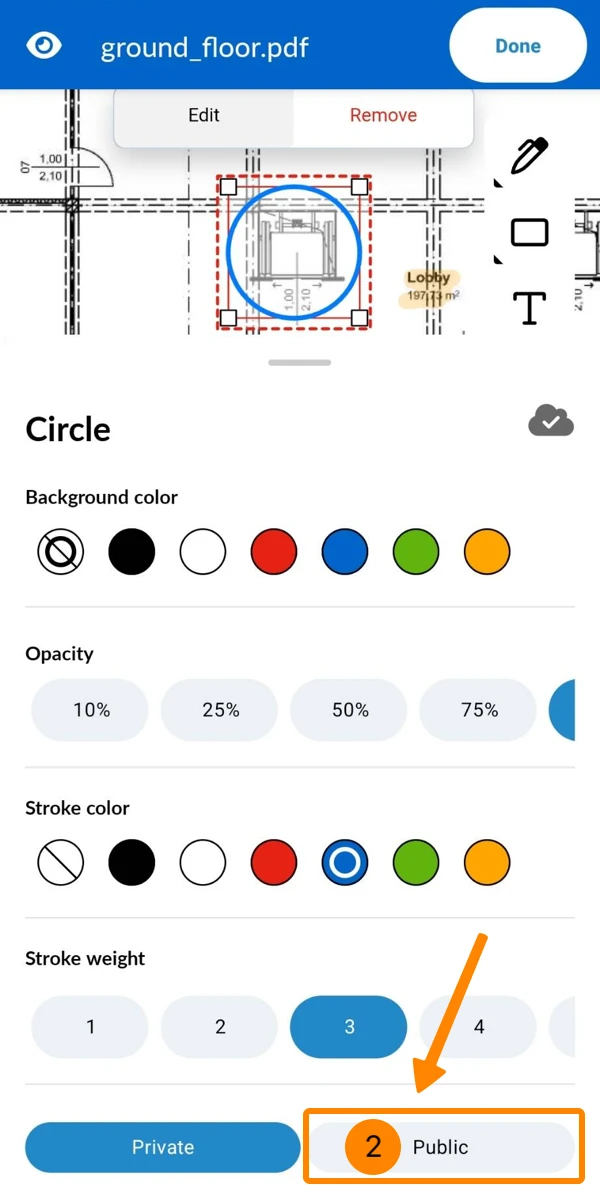
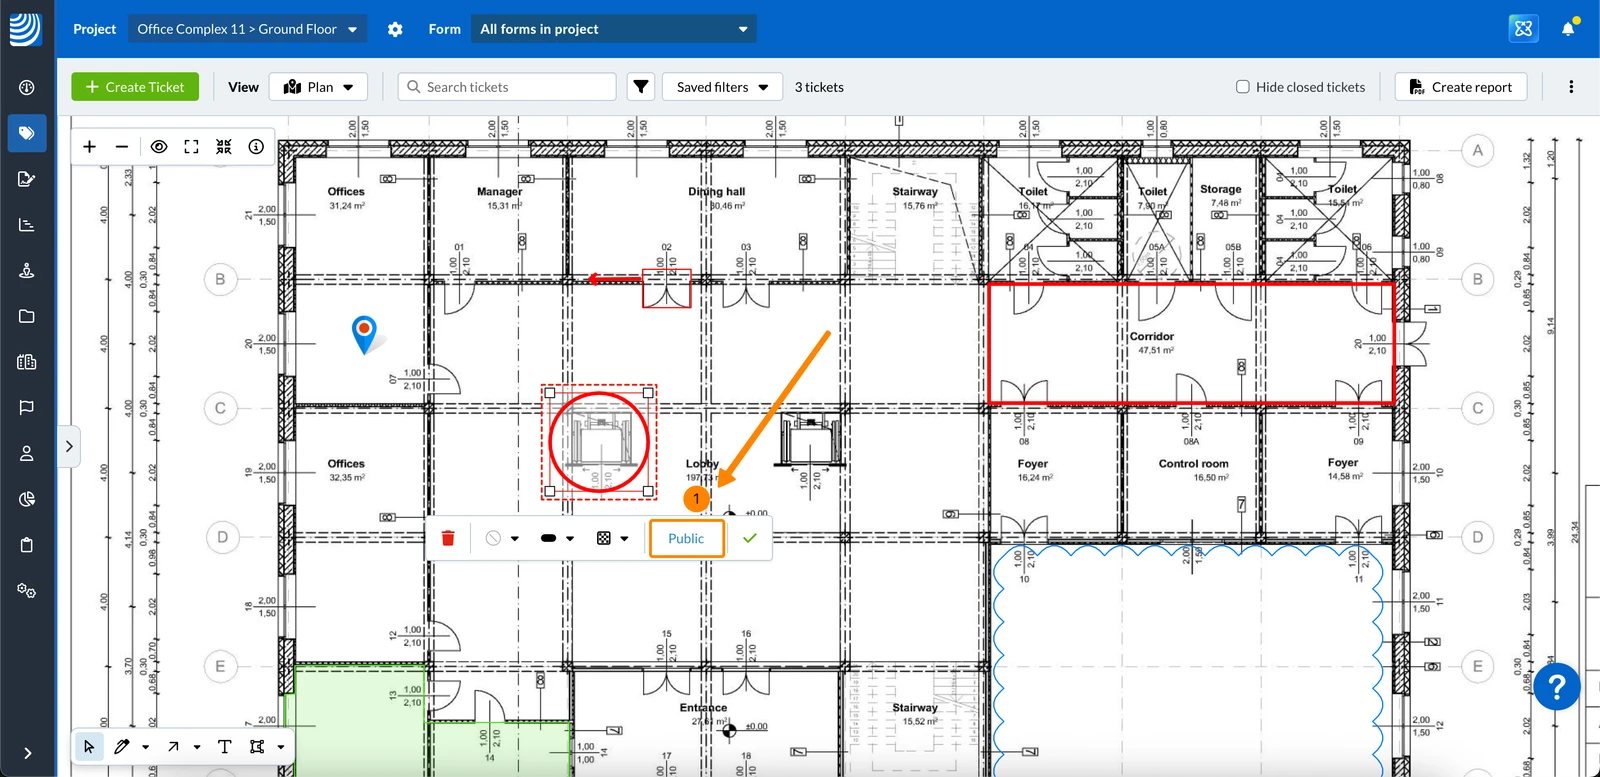
To make a markup public and visible to everyone:
- Click Private (the button always shows the current visibitlity setting)
- Tap Edit
- Tap Public
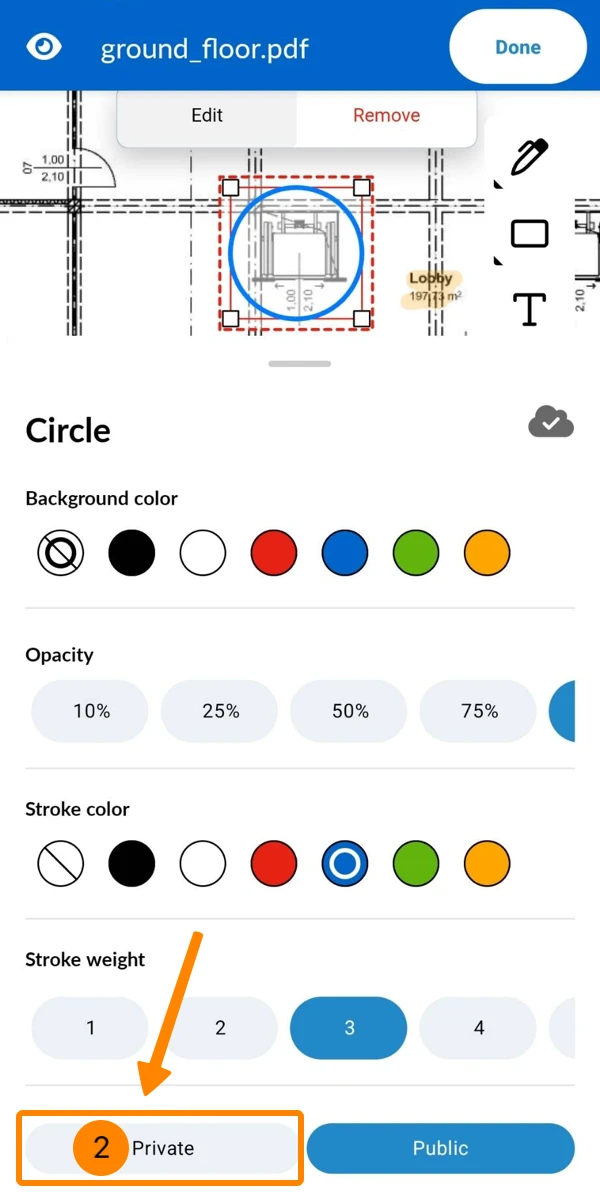
To make a markup private and visible only to you:
- Click Public (the button always shows the current visibitlity setting)
- Tap Edit
- Tap Private
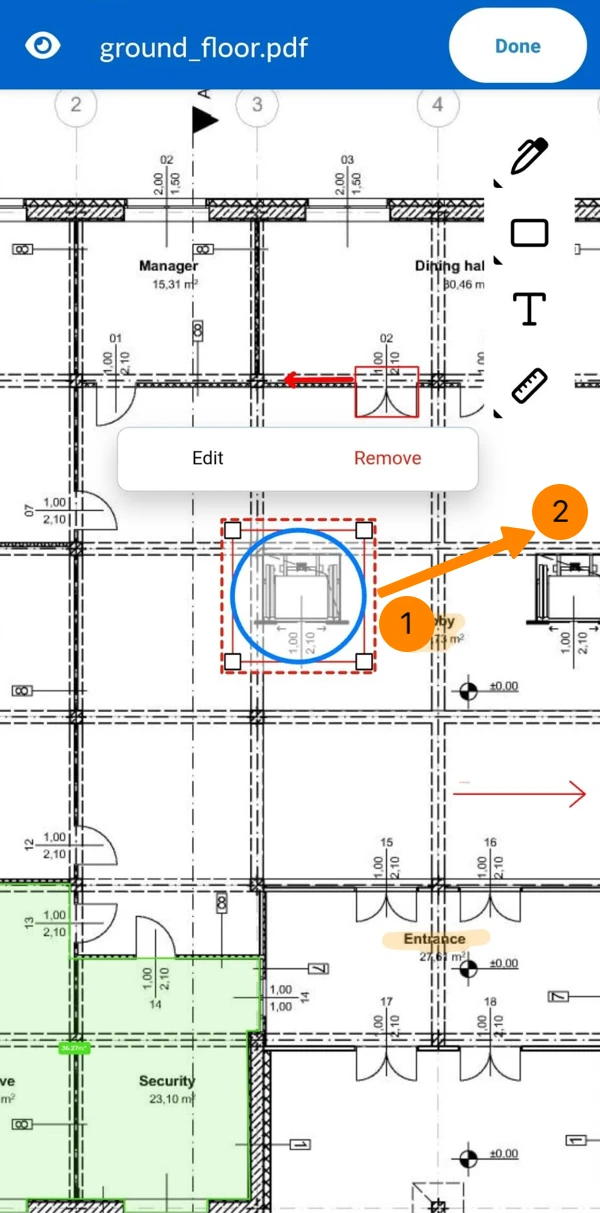
Move a Markup
To move the position of a markup:
- Click the selected markup and hold the mouse button
- Move to the new position and release the mouse button
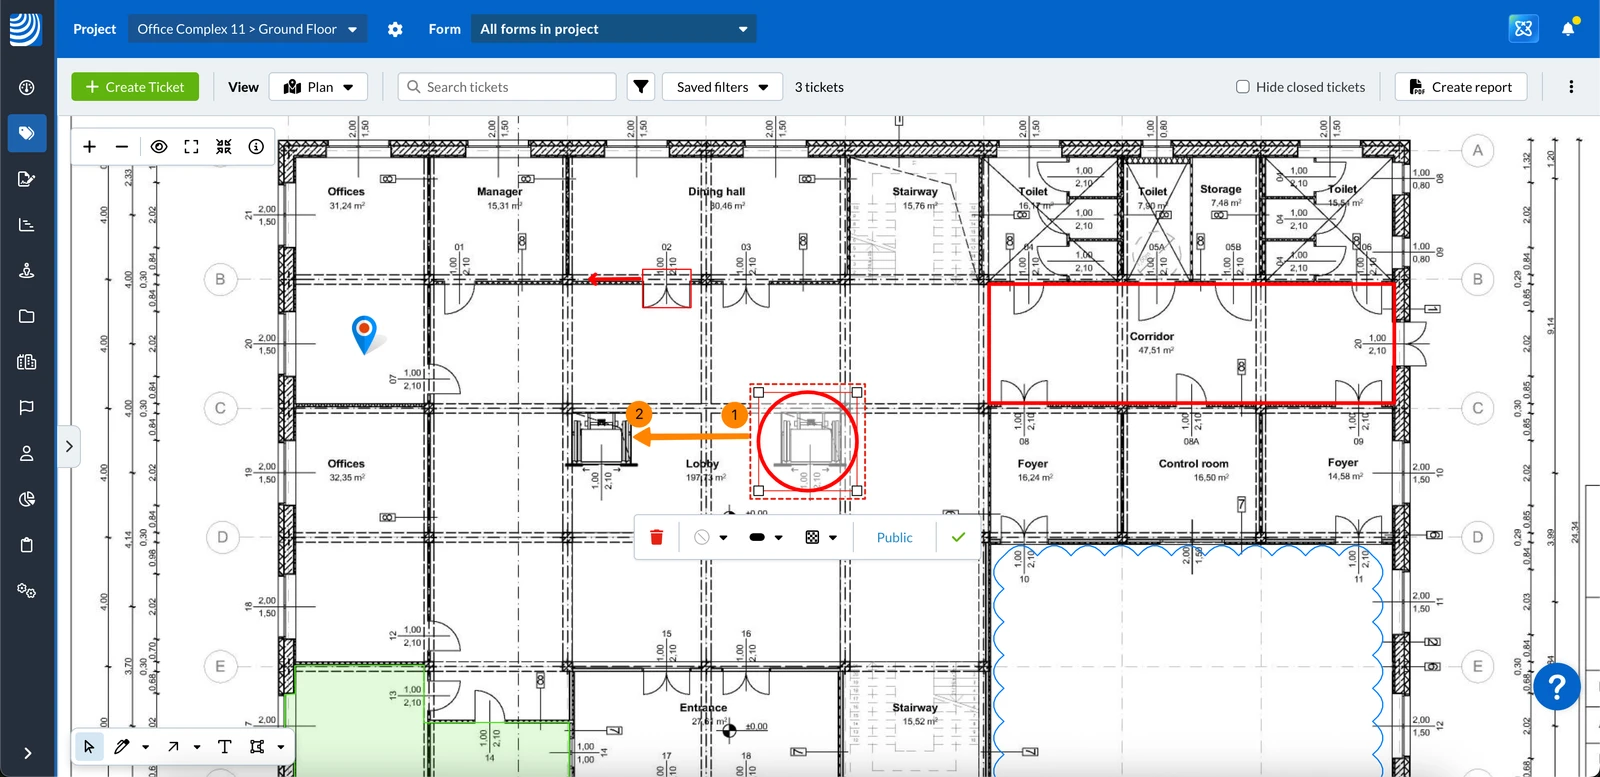
- Tap-hold the selected markup
- Move to the new position and release
Adjust the Line or Shape of a Markup
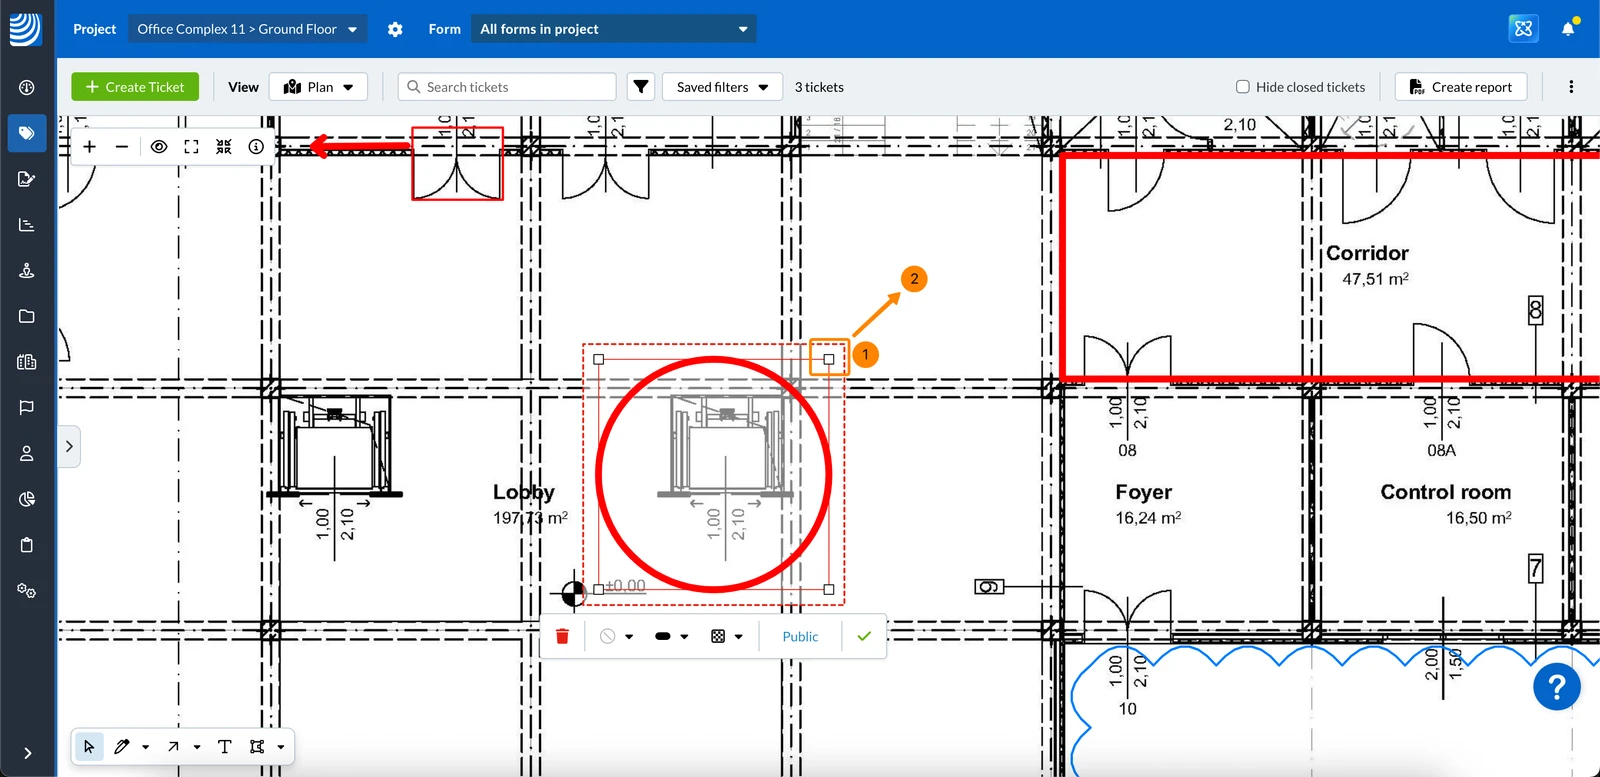
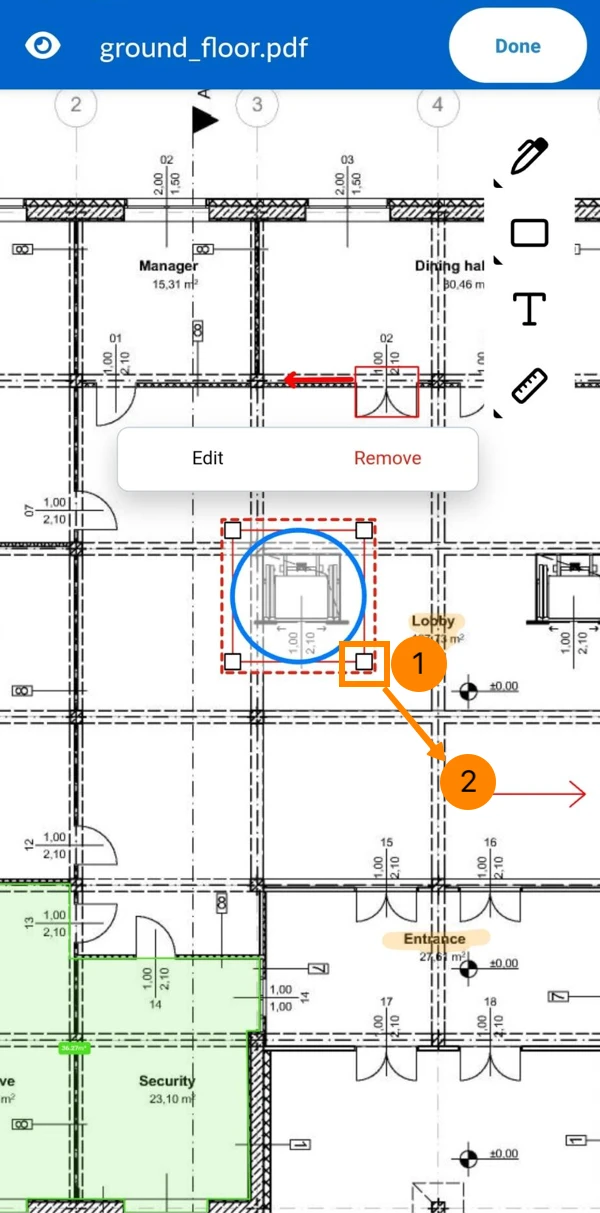
To adjust the points of a line or shape:
- Click one of the points and hold the mouse button
- Move to the new position and release the mouse button
- Tap-hold one of the points
- Move to the new position and release
Delete a Markup
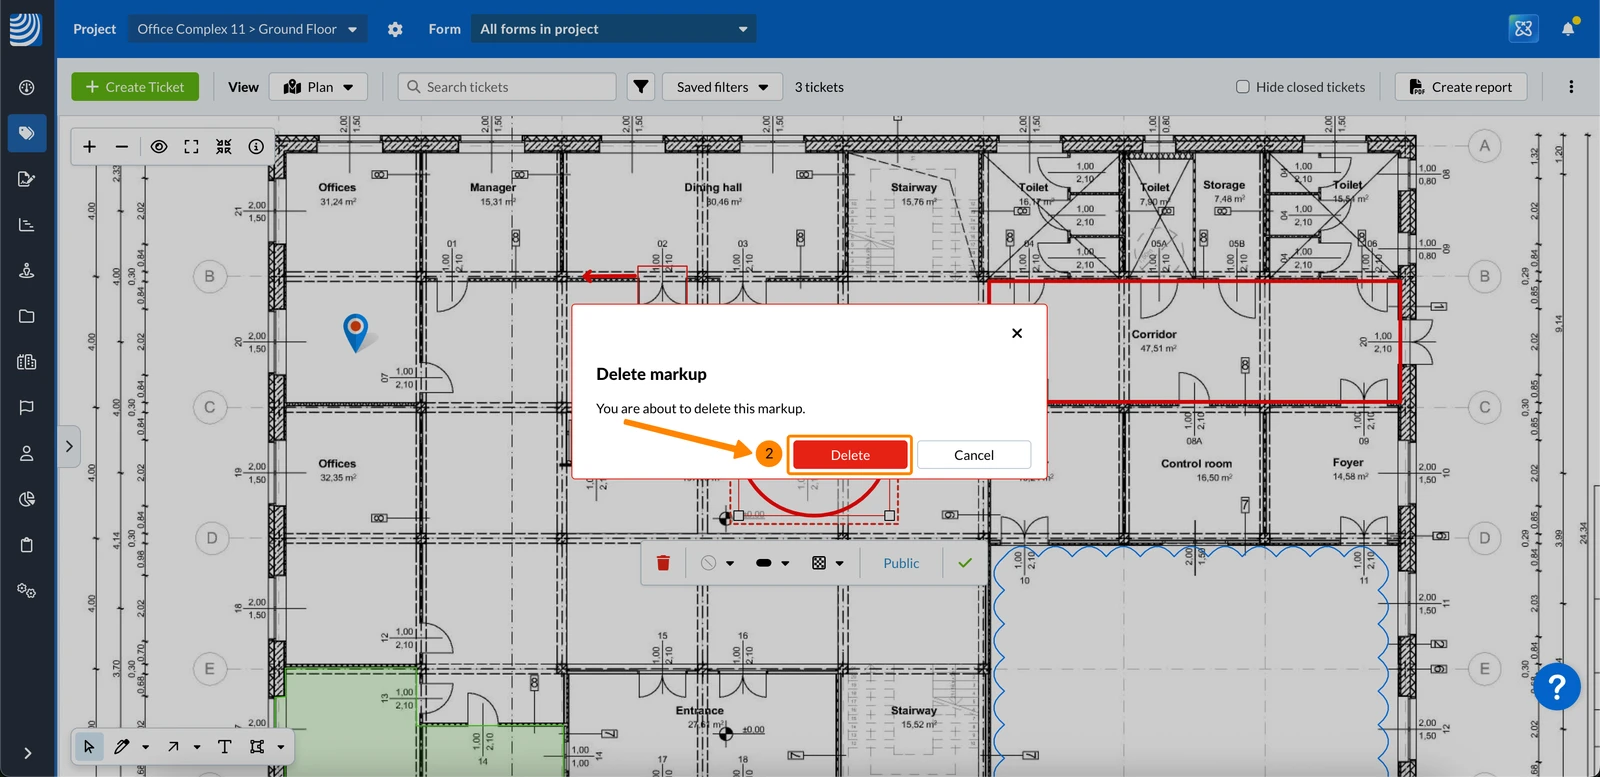
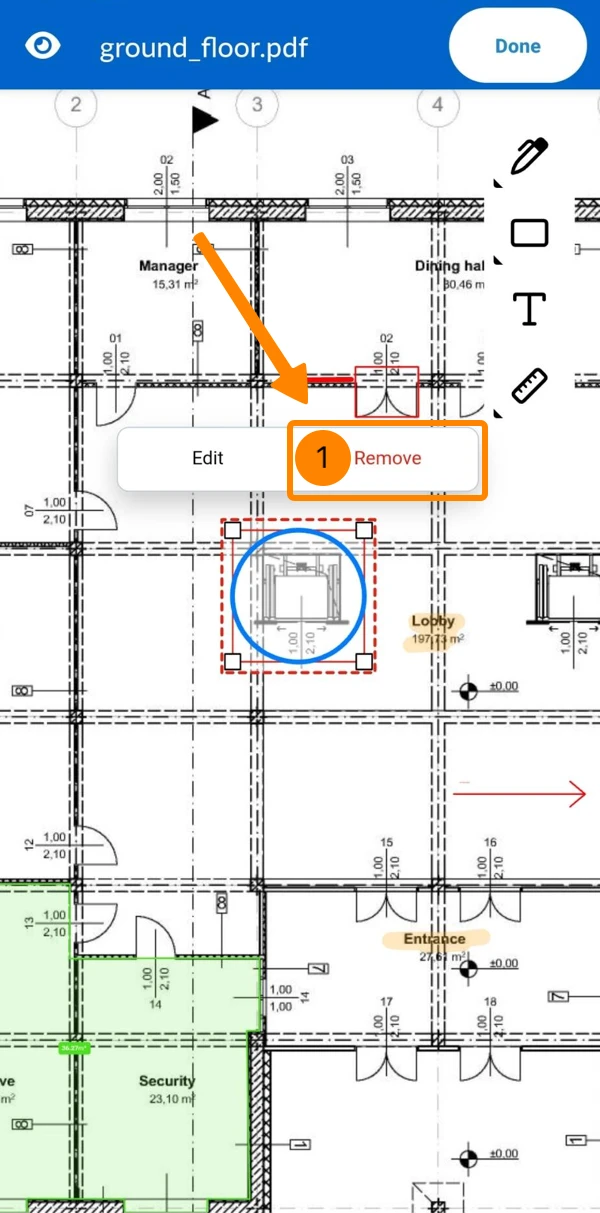
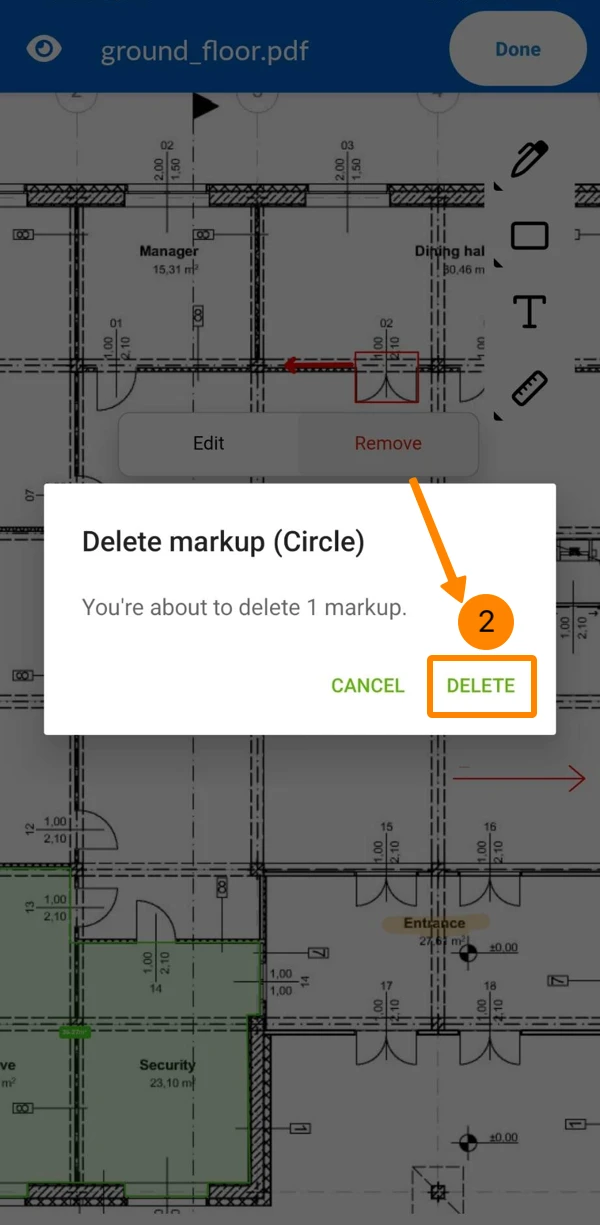
To delete a markup:
- Click the Trash icon
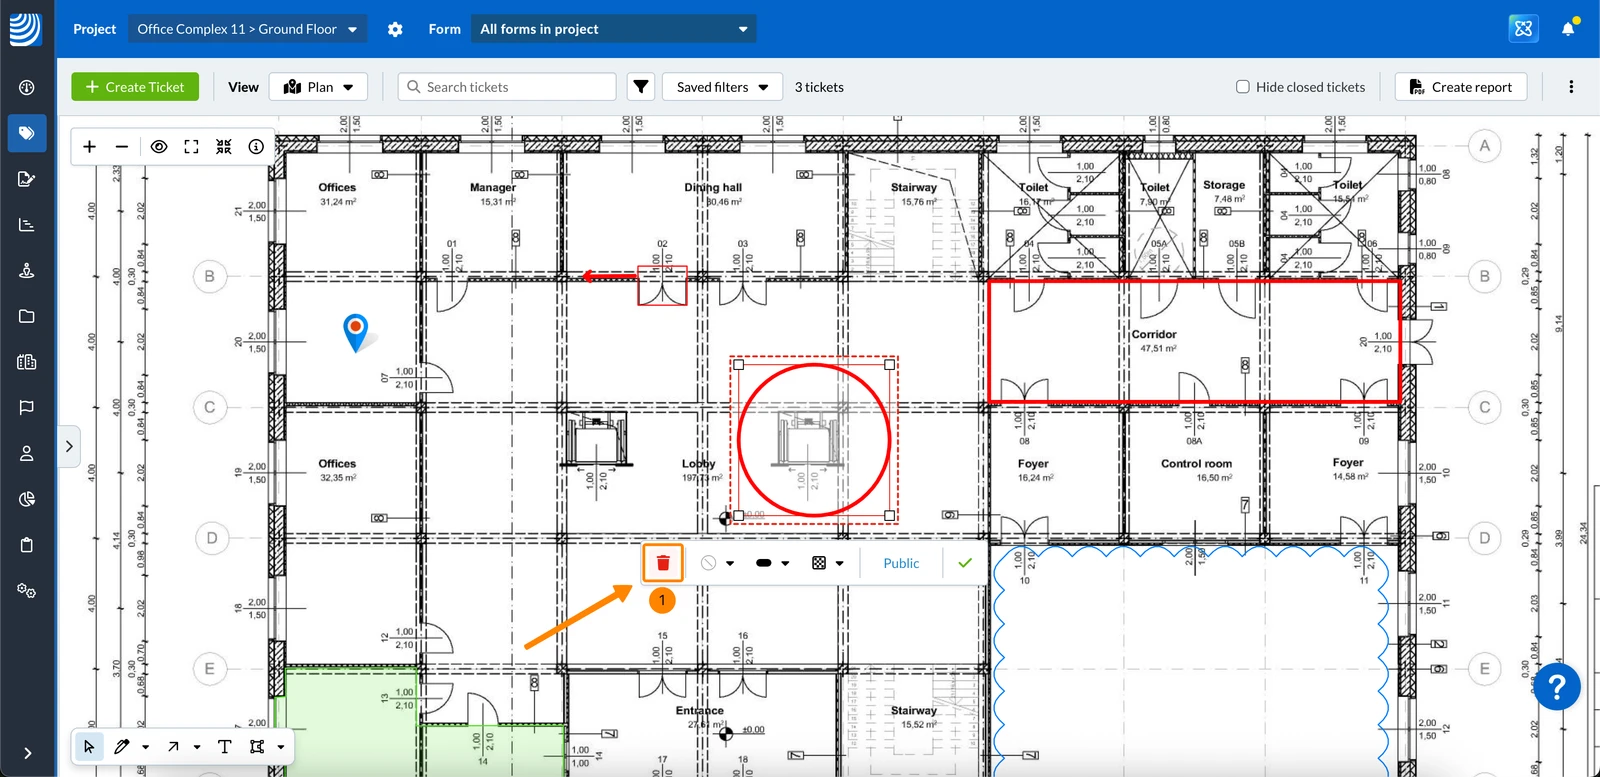
- Click Delete to confirm
- Tap Remove
- Tap Delete to confirm
Customise the Appearance of a Markup
Formatting options vary depending on the type of markup: lines, enclosed shapes, or text.
For Lines
This applies to the following markup tools: Pen, Highlighter, Arrow, Line, Distance, and Path.
For line markups, you can adjust the following:
- Stroke colour
- Stroke weight
- Opacity
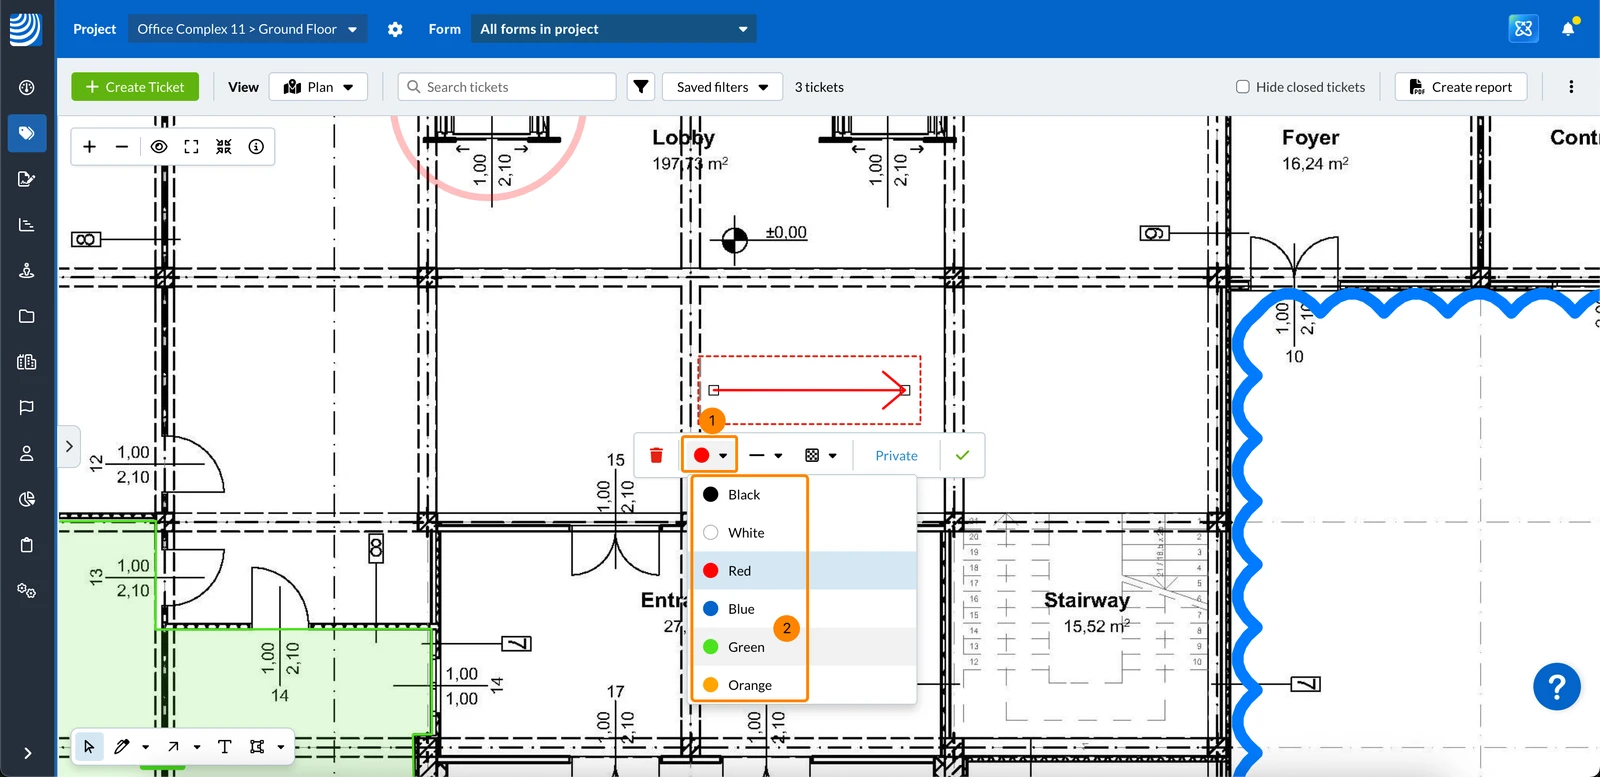
To change the stroke colour:
- Click on the Stroke colour drop-down menu
- Click the colour e.g. Green
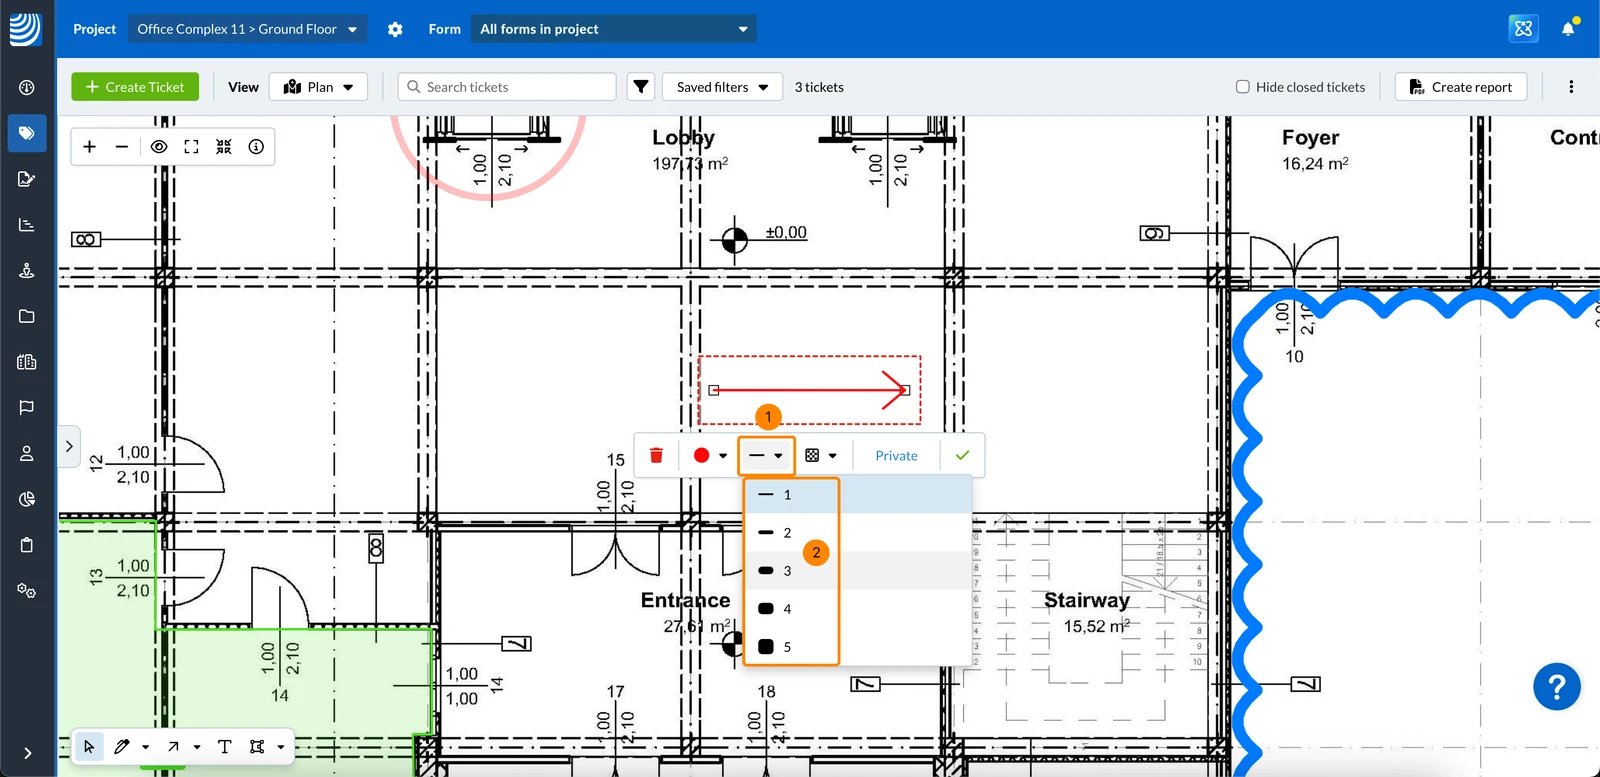
To change the stroke weight:
- Click on the Stroke weight drop-down menu
- Click the stroke weight e.g. 3
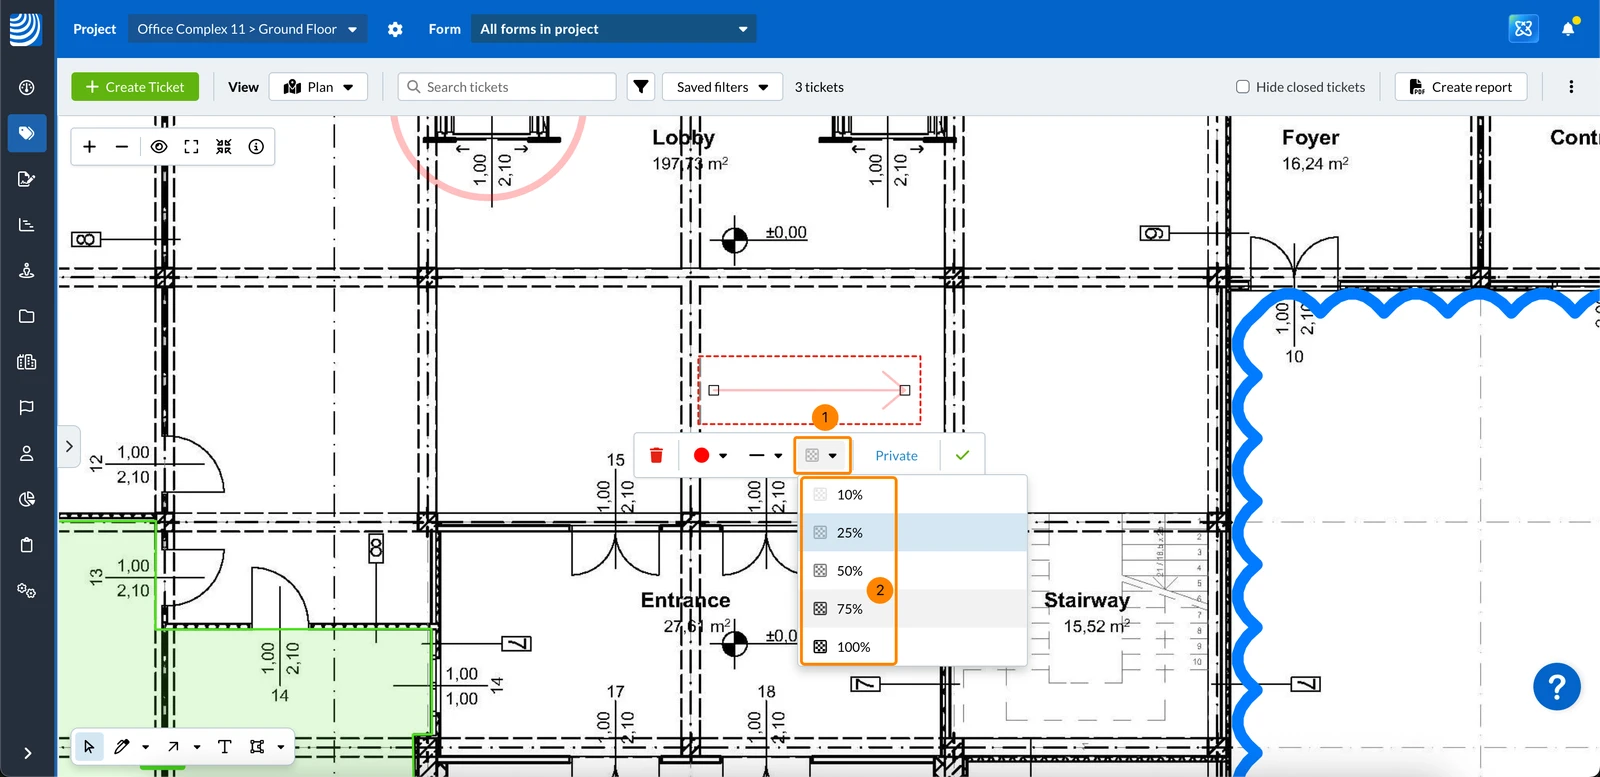
To change the opacity:
- Click on the Opacity drop-down menu
- Click the opacity e.g. 75%
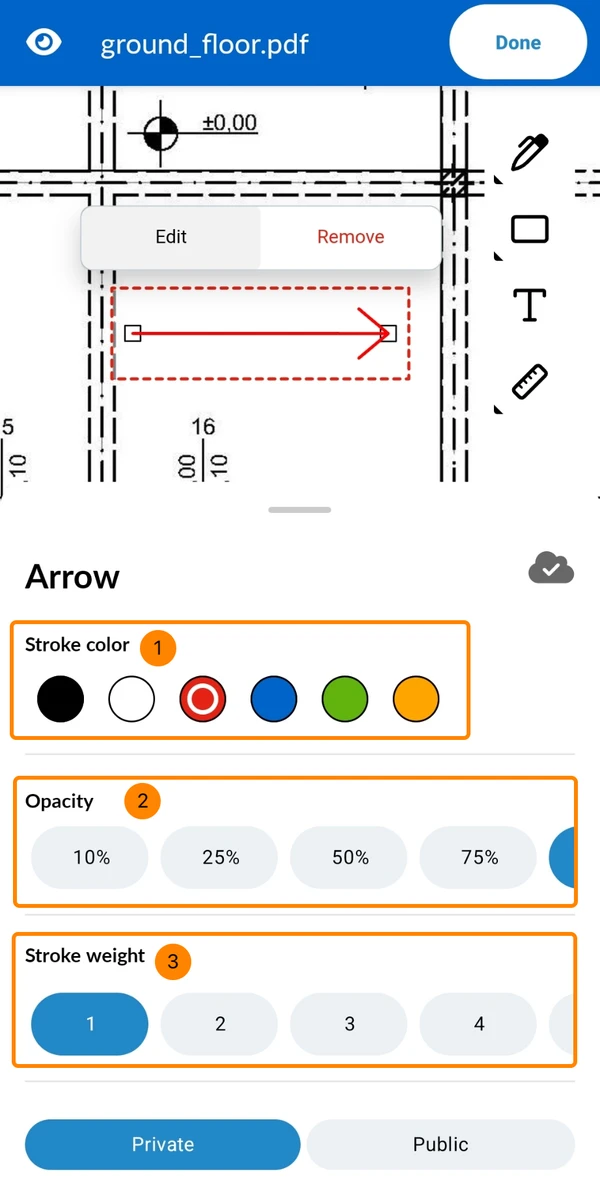
- Select the Stroke colour
- Select the Opacity
- Select the Stroke weight
For Enclosed Shapes
This applies to the following markup tools: Revision Cloud, Rectangle, Circle, Polygon forms and Area measurements.
For enclosed shapes markups, you can adjust the following:
- Background colour
- Stroke weight
- Stroke colour
- Opacity
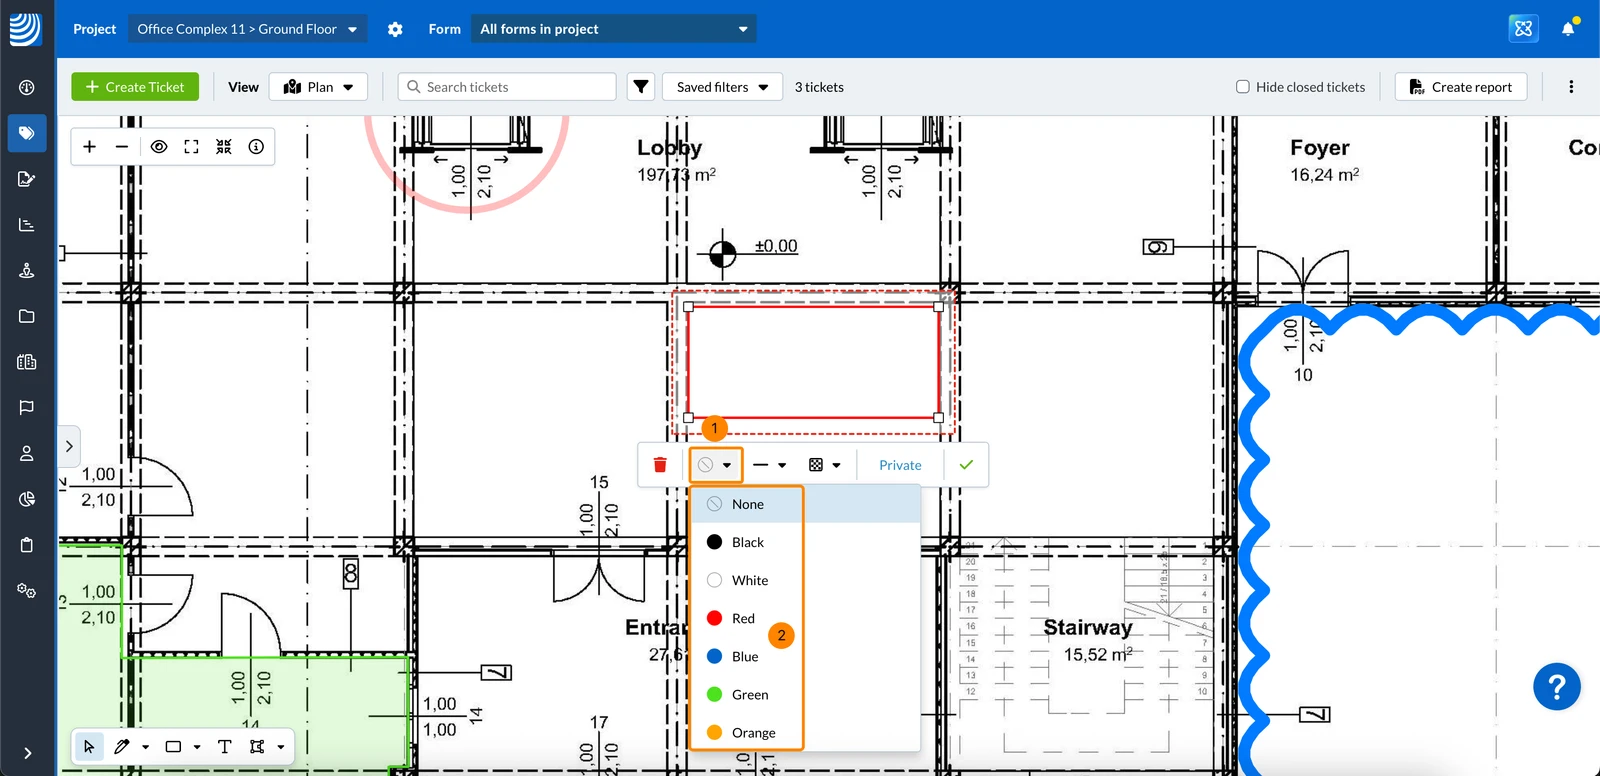
To change the background colour:
- Click on the Background colour drop-down menu
- Click the background colour e.g. Red
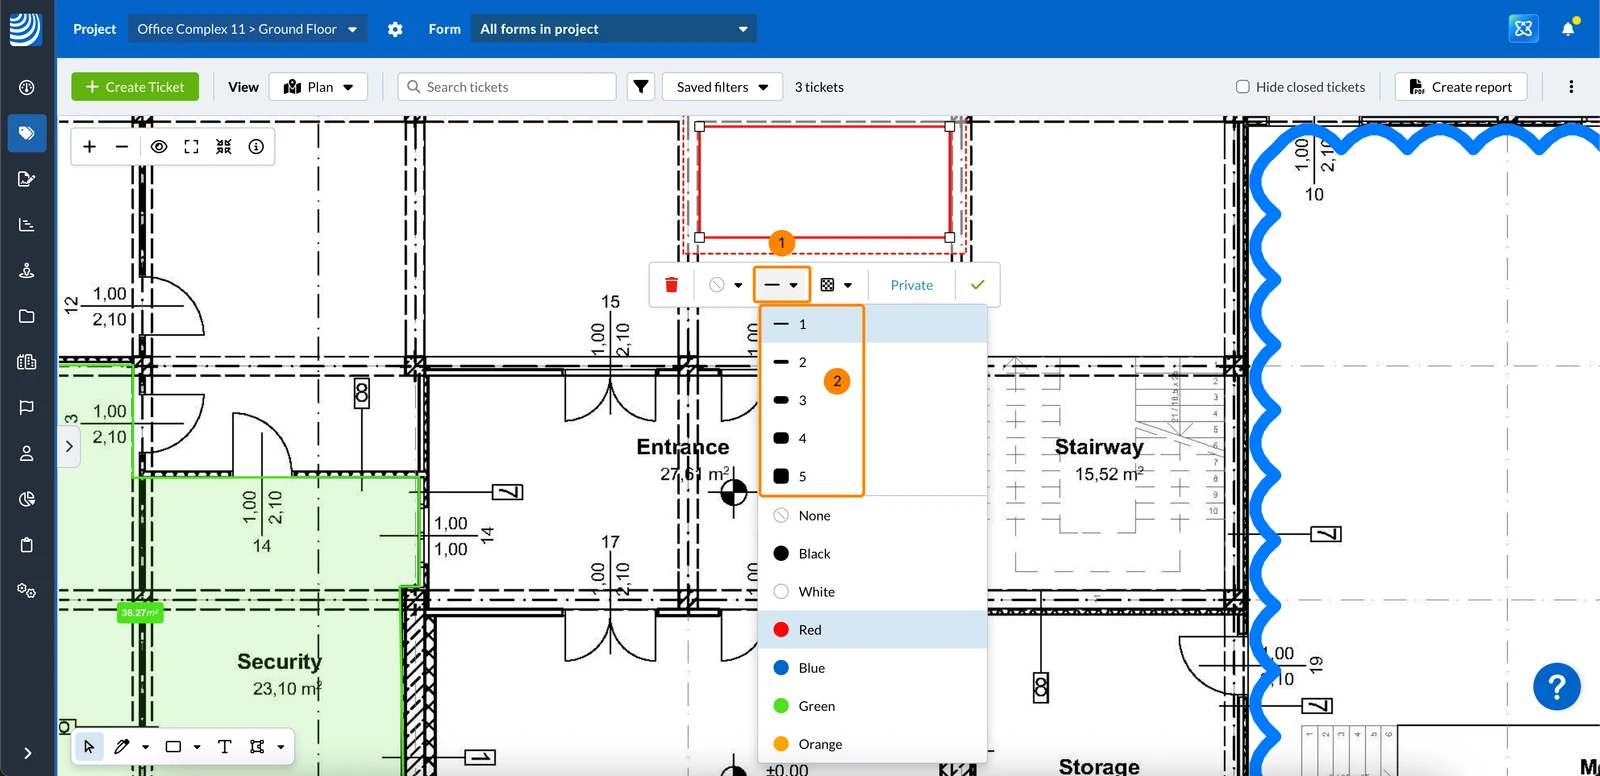
To change the stroke weight:
- Click on the Stroke weight/colour drop-down menu
- Click the stroke weight e.g. 3
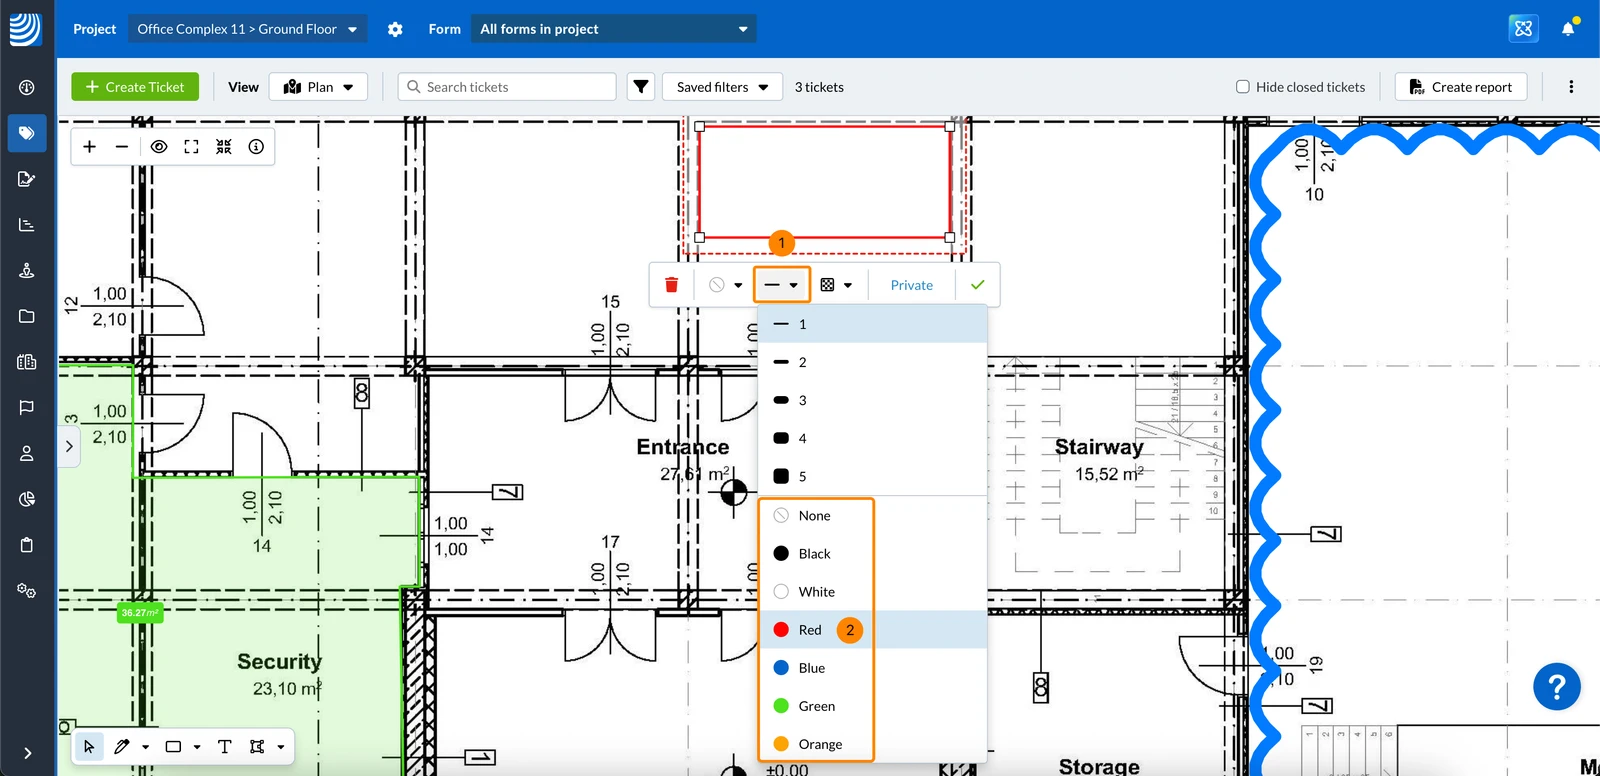
To change the stroke colour:
- Click on the Stroke weight/colour drop-down menu
- Click the colour e.g. Red
To change the opacity:
- Click on the Opacity drop-down menu
- Click the opacity e.g. 25%
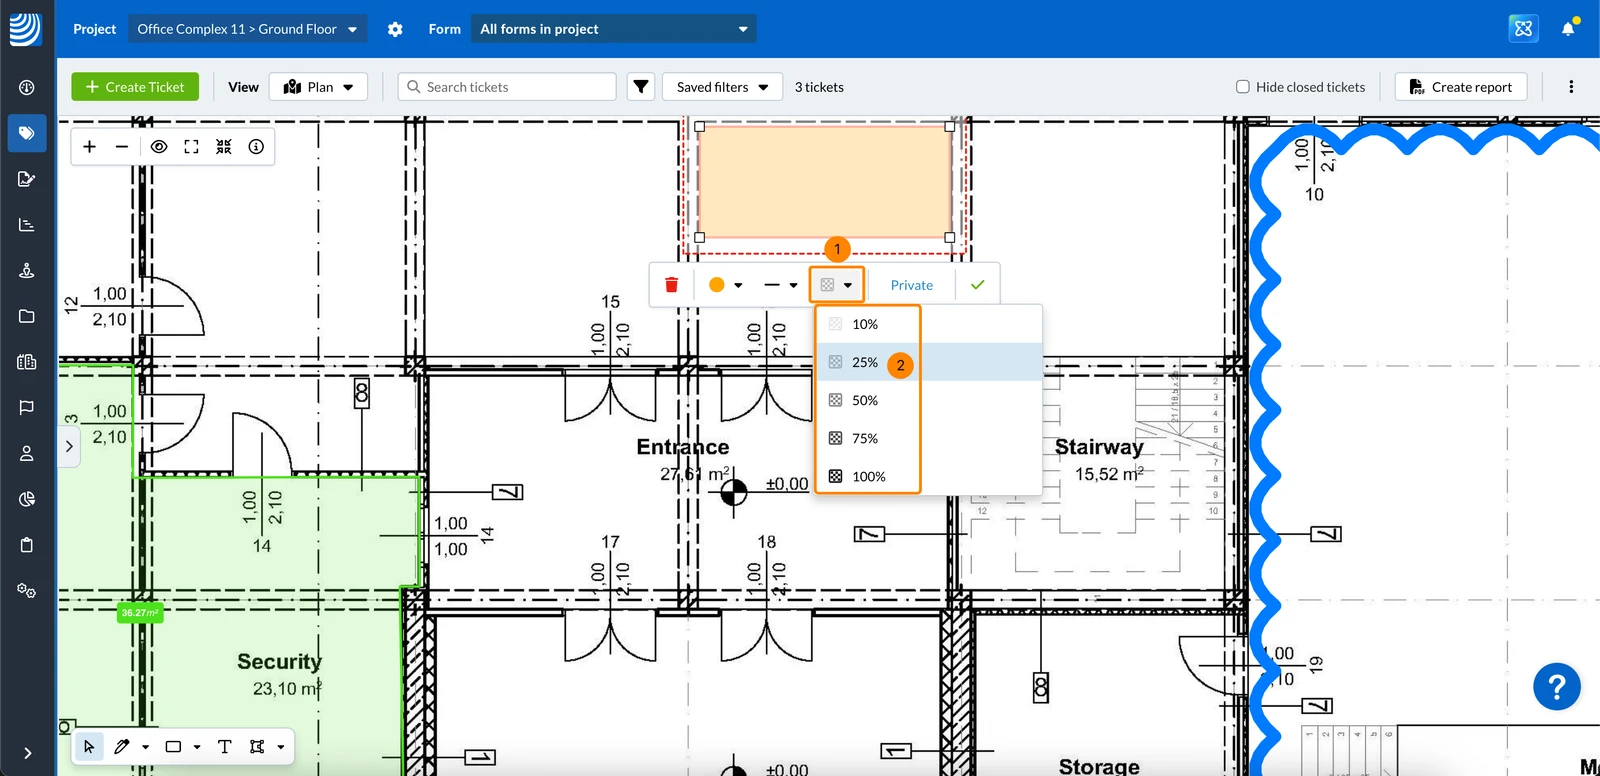
The opacity setting affects both the stroke (outline) and the background (fill) colour.
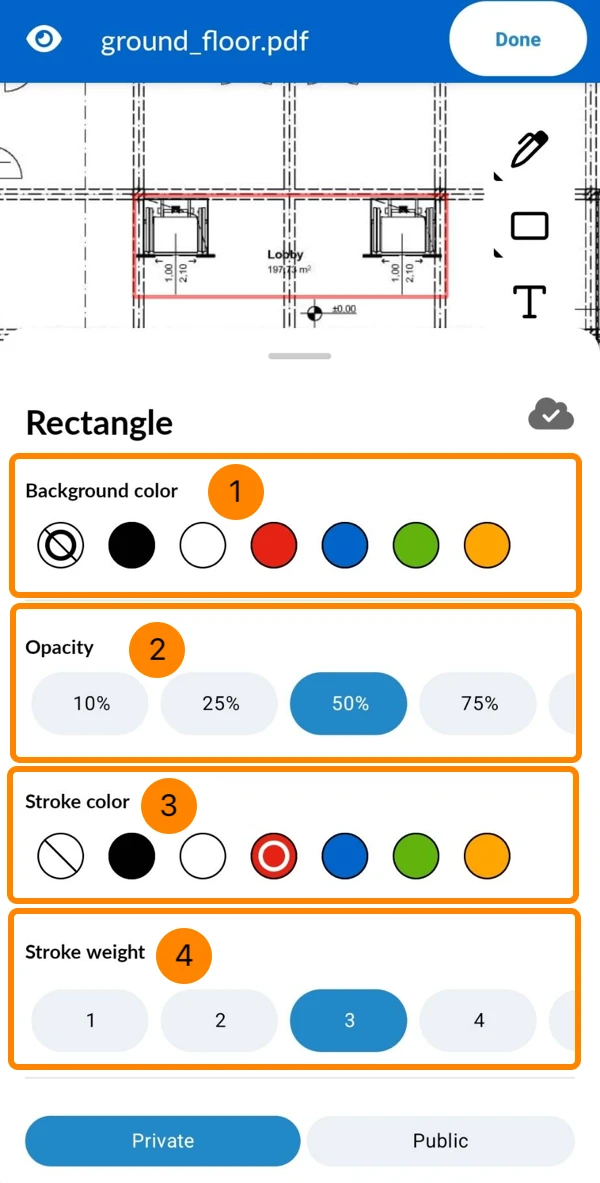
- Select the Background colour
- Select the Opacity
- Select the Stroke colour
- Select the Stroke weight
For Texts
For text markups, you can adjust the following:
-
Font colour
-
Font size
-
Show background
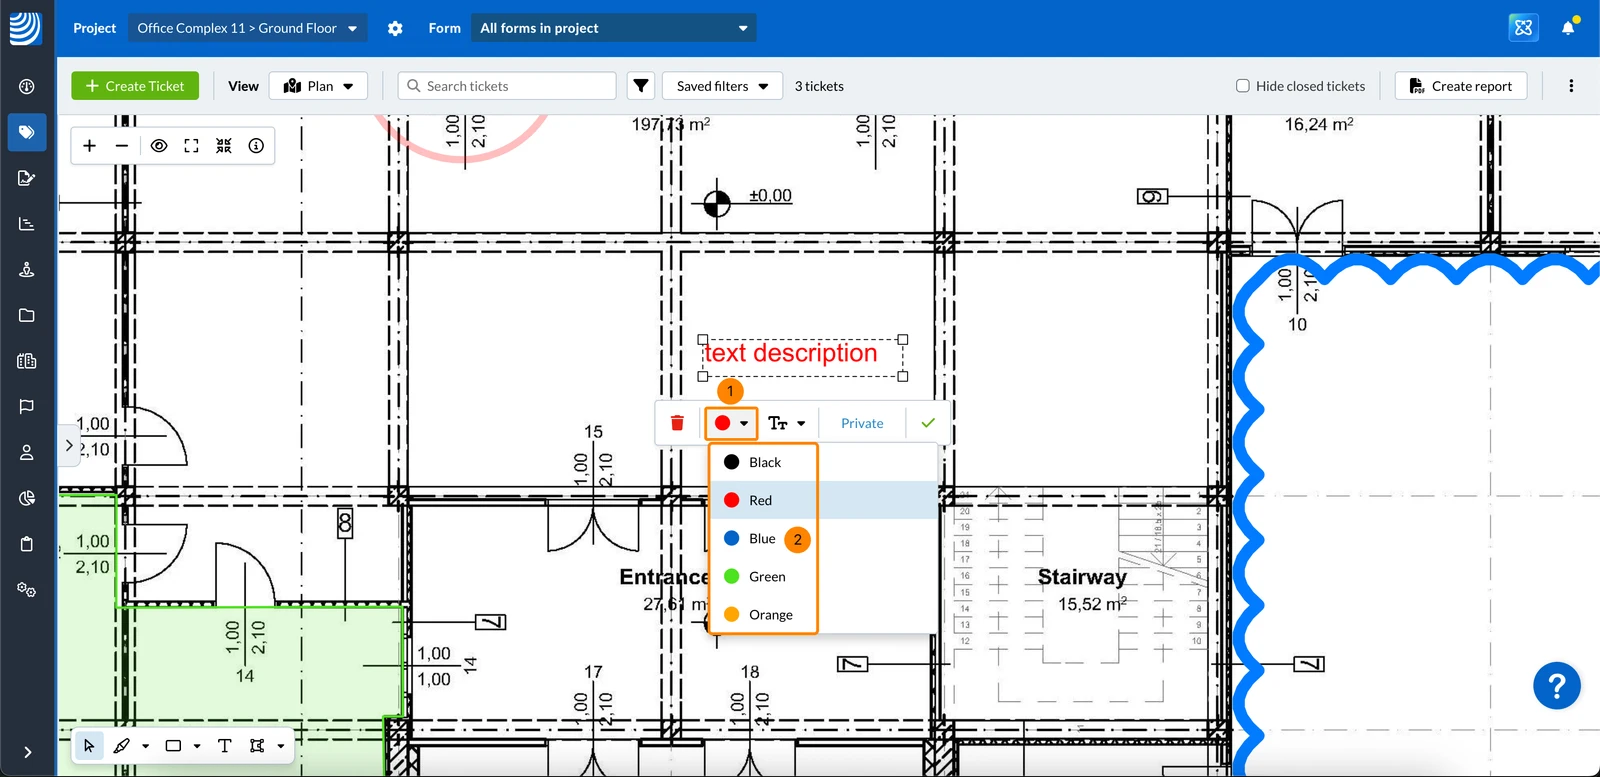
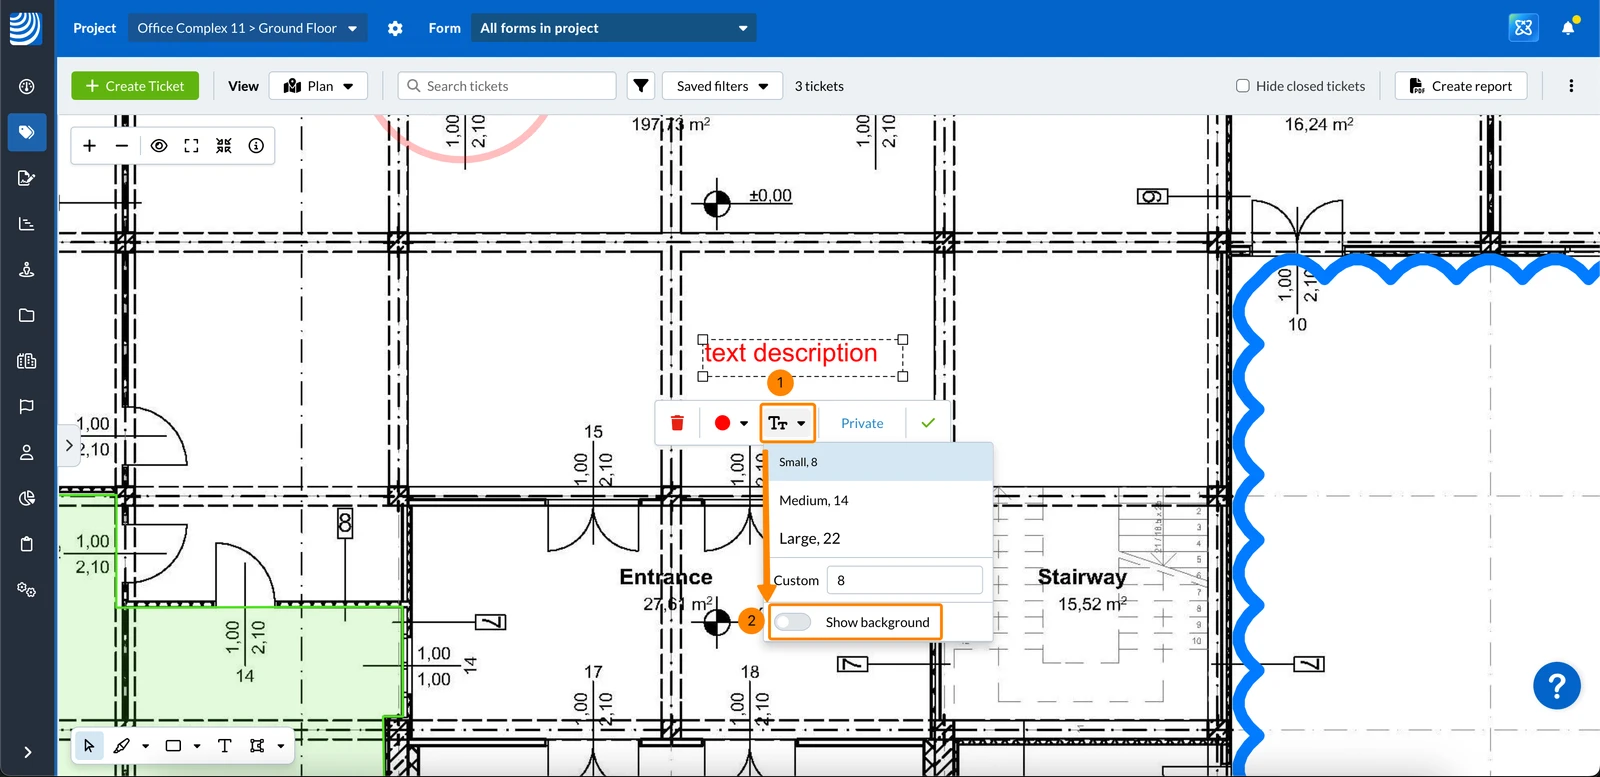
- Enabled – Adds a solid background behind the text using a lighter shade of the text colour, making it easier to read over detailed plans.
- Disabled – No background is applied; the plan remains visible behind the text.
To change the font colour:
- Click on the Font colour drop-down menu
- Click the colour e.g. Blue
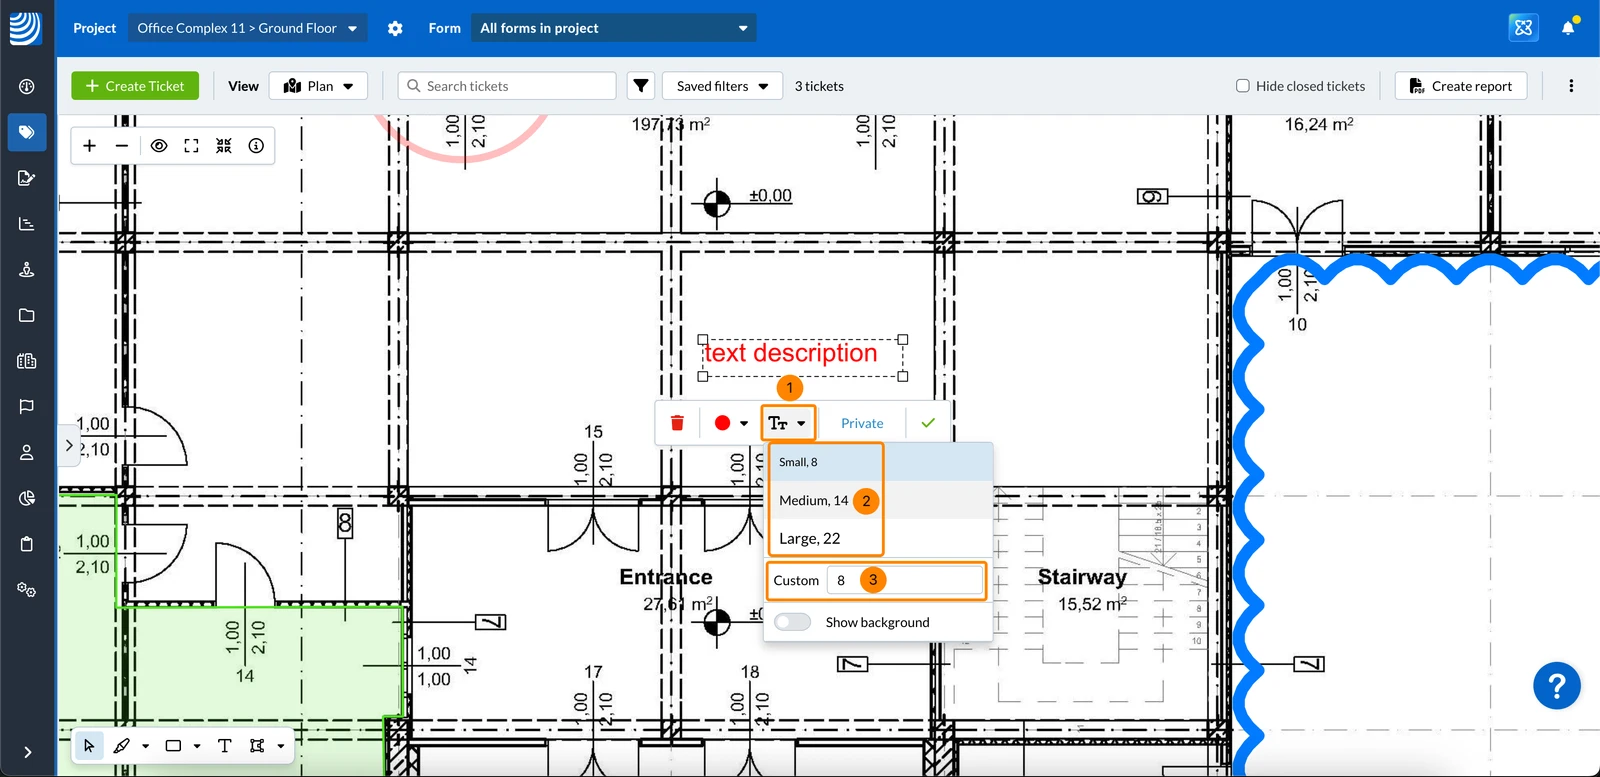
To change the font size:
- Click on the Font size drop-down menu
- Click the font size Small, Medium or Large
- OR enter a Custom font size
To show/hide the background:
- Click on the Font size drop-down menu
- Enable/disable the Show background toggle
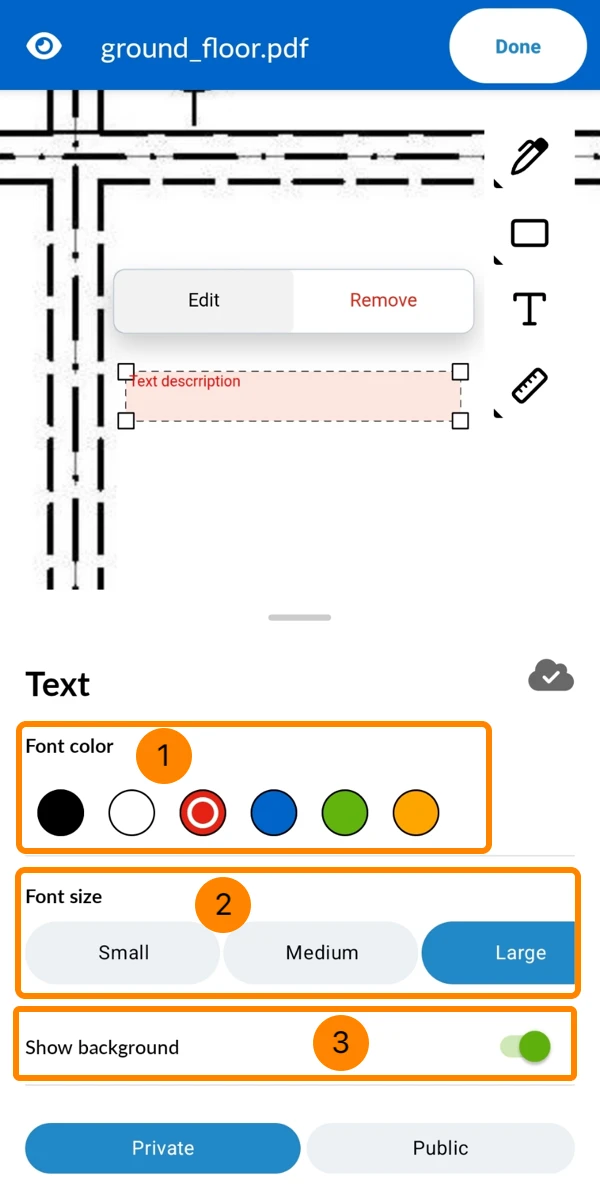
- Select the Font colour
- Select the Font size
- Enable/disable the Show background toggle
Updated June 10, 2026